
Desserts
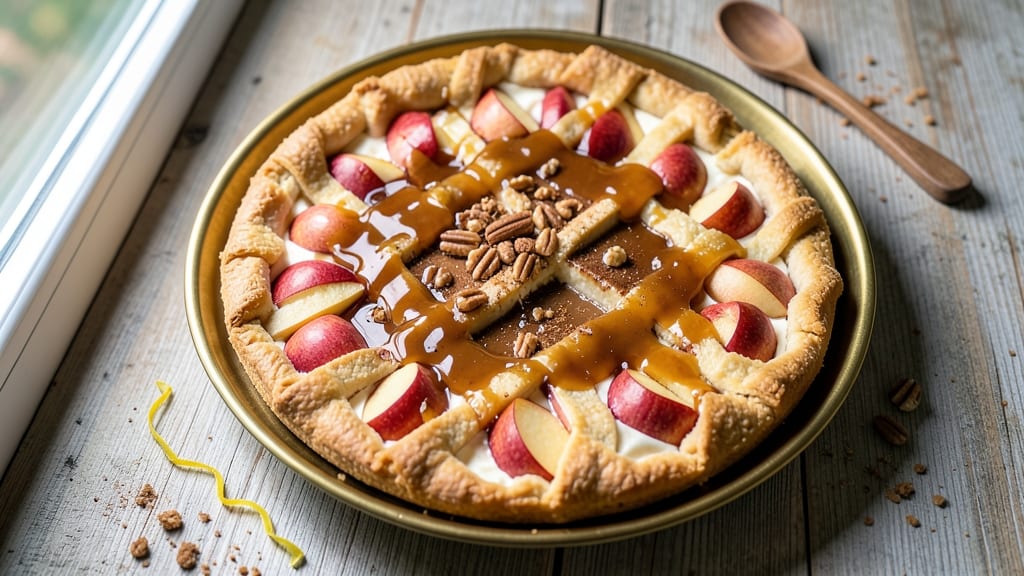
This apple cheesecake pastry recipe combines the rich, creamy indulgence of classic cheesecake with the warm, spiced sweetness of caramelized apples—all wrapped in a buttery, flaky crust.
The secret lies in balancing textures: a crisp, golden pastry base that gives way to velvety cheesecake, topped with tender apple slices that caramelize into a glossy, spiced glaze.
I developed this recipe after years of baking apple desserts, and it’s the one that finally delivered that perfect harmony of tangy, sweet, and buttery layers.
The foundation starts with a foolproof pastry crust made from cold butter and flour, baked until just set before adding the cheesecake filling. The key to the filling is using room-temperature cream cheese and eggs, whipped to a smooth consistency that bakes into a silky, jiggly center.
Meanwhile, the apples—peeled, sliced, and tossed in cinnamon and sugar—soften into a tender, aromatic topping that caramelizes beautifully during baking.
By the time it emerges from the oven, you’ll have a dessert that looks as impressive as it tastes: a golden lattice crust (or simple apple topping) over creamy cheesecake, with pockets of warm, spiced apples peeking through.
The contrast of cool cheesecake and warm apple filling creates a sensory experience that’s both comforting and elegant. Serve it slightly warm with a dollop of whipped cream or a drizzle of caramel for the ultimate dessert showstopper.
This recipe is perfect for special occasions or when you want to impress guests with a homemade dessert that feels restaurant-quality. The best part? It’s easier than it looks—just follow the layering technique, and you’ll achieve that professional finish every time. Let’s get baking!
Ingredients for apple cheesecake pastry
Buttery crust, creamy filling, and spiced apples—this dessert brings all the comfort of fall in one perfect bite.
| Ingredient | Amount | Notes |
|---|---|---|
| All-Purpose Flour 🌾 | 2 ½ cups | Sifted for light texture |
| Unsalted Butter 🧈 | 1 cup | Cold, cubed for pastry |
| Granulated Sugar 🍚 | ½ cup | For crust sweetness |
| Large Eggs 🥚 | 1 whole | Room temperature for crust |
| Salt 🧂 | ½ tsp | Fine sea salt preferred |
| Cream Cheese 🧀 | 16 oz | Room temperature, full-fat |
| Powdered Sugar 🍚 | 1 cup | For cheesecake topping |
| Sour Cream 🥛 | ½ cup | Full-fat for creaminess |
| Vanilla Extract 🌿 | 1 tsp | Pure vanilla preferred |
| Apples 🍎 | 4 medium | Peeled, sliced 1/4-inch thick |
| Ground Cinnamon 🌶️ | 2 tsp | For apple spice blend |
| Brown Sugar 🍚 | ¼ cup | Light brown preferred |
| Lemon Juice 🍋 | 1 tbsp | Freshly squeezed |
The butter is non-negotiable here. Plugrá brand from the grocery store freezer section is my go-to—it stays cold longer and gives that perfect flakiness. For the apples, Honeycrisp or Granny Smith work best—they hold their shape while caramelizing. If you can't find those, Fuji or Gala are solid backups. The cream cheese? Philadelphia brand is reliable, but if you want to splurge, Wisconsin Brick from specialty stores adds a richer flavor. Keep everything cold until you're ready to mix the crust—room-temperature butter means a tough pastry.
No vanilla extract? Vanilla bean paste works beautifully, or even a scraped vanilla bean. Short on sour cream? Greek yogurt at half the amount gets you close, but trust me on the full-fat version for that perfect texture. The apples can be prepped ahead—toss them with cinnamon and sugar, cover, and refrigerate for up to 24 hours before baking. For the crust, if you don't have a food processor, pulse the butter and flour in a strong blender until it resembles coarse crumbs. The key is keeping everything cold—don't overwork the dough or it'll get tough.
This dessert tastes even better the next day when the flavors meld. Store the whole pie in an airtight container at room temperature for 2 days, or refrigerate for up to 5 days. For longer storage, wrap tightly in plastic and freeze for 3 months. I always make a double batch—one for immediate serving and one to freeze. When reheating, warm at 350°F for 15 minutes to restore that perfect contrast of cool cheesecake and warm apples. Serve with a dollop of whipped cream or a drizzle of caramel for the ultimate presentation.
Why You'll Love This Recipe
- No Butter Waste: I swear by this trick—every last crumb of that rich, cold butter gets used. The dough comes together with just flour, sugar, and eggs, but the butter? It’s the star. You’ll end up with that signature flaky, melt-in-your-mouth pastry that tastes like it took hours (but didn’t).
- Apple Magic: That crisp-tender apple filling? It’s the kind of flavor that makes you pause mid-bite. The sugar caramelizes just enough to balance the tartness, and the cheesecake layer adds this velvety richness—like dessert had a makeover but stayed totally homestyle.
- Weeknight Hero: Between us, this is my go-to for potlucks, last-minute gatherings, or when I need something impressive without stress. The pastry’s sturdy enough to hold its shape, and the filling stays creamy even after sitting. Honestly, it’s the kind of dish that makes you look like a baking pro.
- Leftovers? Please: This recipe actually begs for seconds. The texture holds up for days, so you can prep it ahead and still serve it at room temperature. And if you’re anything like me, you’ll find yourself sneaking slices for breakfast—trust me, it’s even better cold.
Step-by-step instructions for apple cheesecake pastry
Let's create a showstopping dessert that combines a buttery pastry crust with a velvety cheesecake and spiced apple filling.
Prepare the Perfect Pastry Crust
In a large bowl, combine the 2.5 cups all-purpose flour and 0.5 tsp salt. Cut in the 1 cup cold, cubed unsalted butter using a pastry cutter or your fingers until the mixture resembles coarse crumbs with pea-sized butter pieces. This texture is crucial for a flaky crust.
Add the 0.5 cup granulated sugar and mix until evenly distributed. Then, add the 1 whole large egg and mix just until the dough comes together. Be careful not to overwork it—just combine until it forms a shaggy dough. Divide the dough into two equal portions and flatten each into a disk.
Wrap each disk tightly in plastic wrap and refrigerate for at least 30 minutes (or up to 2 hours). Chilling relaxes the gluten and makes rolling easier. Preheat your oven to 375°F while the dough chills. This warm oven will help the crust bake perfectly when we assemble everything.
Assemble the Cheesecake Filling
In a separate large bowl, beat the 16 oz cream cheese and 0.5 cup sour cream together until completely smooth. Add the 0.5 cup granulated sugar and mix until fully incorporated. Then add the 1 whole large egg and 1 tsp vanilla extract, mixing just until combined—don't overmix or the cheesecake will be dense.
This is where the magic happens: the cheesecake filling needs to be silky smooth. If you notice any lumps, strain the mixture through a fine-mesh sieve to ensure a perfect texture. Pour the filling into a 9-inch springform pan lined with parchment paper, smoothing the top with a spatula.
Here's the thing—this filling is delicate. Don't worry about getting it perfectly even; we'll handle any imperfections with the apple topping. The key is to get it into the pan before it sets up too much.
Create the Spiced Apple Filling
While the cheesecake filling sets slightly (about 15 minutes at room temperature), prepare the apple topping. Peel and slice the 4 medium apples into ¼-inch thick slices. Toss them with 1 tbsp lemon juice, 0.25 cup brown sugar, 2 tsp ground cinnamon, and a pinch of salt in a large bowl.
Let the apples sit for 10 minutes while you roll out the pastry. This marinade will tenderize the apples and infuse them with flavor. The lemon juice prevents browning, and the cinnamon gives that warm, comforting spice that pairs perfectly with the tangy cheesecake.
After the marinating time, drain any excess liquid from the apples and set aside. We want a thick, flavorful topping—not a soggy one.
Build the Cheesecake Layers
Roll out one of the chilled pastry disks to fit the bottom of your 9-inch springform pan. Press it gently into the bottom, leaving a slight overhang. Trim any excess dough with a sharp knife, leaving about ½-inch border. This will create a beautiful, clean edge when baked.
Roll out the second pastry disk to about 12x12 inches—this will be our lattice top. Cut the dough into ½-inch wide strips using a sharp knife or pizza cutter. Arrange 6 strips horizontally across the top of the cheesecake, spacing them about ½-inch apart. Then, cut 6 more strips vertically and weave them through the horizontal strips to create a lattice pattern.
This lattice isn't just for looks—it allows steam to escape while keeping the apples contained. Brush the lattice lightly with a beaten egg wash (1 egg + 1 tbsp water) for a golden finish. Arrange the spiced apple slices on top of the cheesecake filling, leaving small gaps between them for the lattice to peek through.
Bake to Golden Perfection
Place the assembled cheesecake in the 375°F oven and bake for 40-45 minutes, until the crust is deep golden brown and the apples are tender. The cheesecake filling should be just set in the center—it will continue cooking slightly as it cools.
Here's where patience pays off: let the cheesecake cool completely at room temperature for 2 hours before chilling in the refrigerator for 4 hours (or overnight). This slow cooling process prevents cracking and allows all the flavors to meld beautifully. Dust with 1 cup powdered sugar just before serving for that final touch of elegance.
Slice into wedges and serve with a dollop of whipped cream if desired. Each bite will deliver that perfect balance of buttery pastry, creamy cheesecake, and warm spiced apples—a true crowd-pleaser!
Pro Tips For Making Apple Cheesecake Pastry
- CHILL THE DOUGH FIRST: If you’re rolling out that pastry dough straight from the fridge, you’re asking for tears. Let it sit on the counter for 10-15 minutes—just until it’s pliable but still cool. Warm dough stretches unevenly and shrinks back when it hits the oven, leaving you with a sad, puckered crust instead of a smooth, golden base.
- CUT BUTTER IN SMALL: You’re not making pie dough—this is a tender, crumbly pastry. Pulse the butter in the food processor until it’s pea-sized, not paste. Overworking it turns the dough greasy and tough, and no one wants a chewy pastry fighting with that creamy apple filling.
- DON’T OVERMIX THE FILLING: Once you fold in the apples, stop. Stir just until they’re evenly distributed—no need to mash them into oblivion. Overmixing breaks down the texture, turning your pastry into a soggy bottom. A few chunks of apple? That’s the good stuff.
- BLIND BAKE THE CRUST: Skip the raw egg wash on top—it’ll steam and make your crust soggy. Instead, blind-bake the crust for 12-15 minutes with pie weights or dried beans. The extra time ensures it holds up to the filling without collapsing, especially if you’re layering that rich cheesecake mixture on top.
Essential equipment for perfect results
Pastry Tools Essentials
Start with a 9-inch springform pan—this is non-negotiable for even baking and easy release. I swear by Nordic Ware pans for their sturdy construction and nonstick finish.
For the pastry dough, invest in a pastry cutter (like the OXO Good Grips) or use your fingers if you're comfortable with the texture. A rolling pin with a textured surface prevents sticking—my go-to is the Jamie Oliver brand.
Don’t forget a sharp chef’s knife (I use Wüsthof) for trimming edges and cutting lattice strips. 🧈
Mixing & Measuring
For precise measurements, use a digital kitchen scale (like the OXO Good Grips) for the flour and butter—this eliminates packing issues. A medium mixing bowl (at least 5-quart capacity) keeps everything contained while cutting butter into flour.
For the cheesecake filling, a hand mixer (like the KitchenAid KSM150PSER) with a paddle attachment ensures smooth, lump-free mixing. Strain the filling through a fine-mesh sieve (I keep one from Le Creuset) for that ultra-silky texture. ⚡
Apple Prep Tools
Peeling and slicing apples efficiently requires a peeler (I love the Y-shaped Oxo Good Grips) and a mandoline (like the Benriner) for even ¼-inch slices. A large mixing bowl (at least 8-quart) holds the apples while they marinate.
For tossing, use a rubber spatula (like the Silpat) to coat every slice evenly. A slotted spoon helps drain excess liquid without losing those flavorful spices. 🍎
Baking & Finishing
Preheat your oven with a thermometer (like the Thermoworks Oven Thermometer) to ensure 375°F accuracy—this prevents under- or over-baking. For the lattice, a pizza cutter makes clean, even strips faster than a knife.
Brush the lattice with an egg wash (1 egg + 1 tbsp water) using a pastry brush (I prefer Silpat’s soft bristles). Chill the cheesecake in the bottom shelf of the fridge for even cooling. Dust with powdered sugar using a fine-mesh sieve for a snowy finish. ✨
Optional Upgrades
For a professional touch, use a water bath (wrap the springform pan in foil and place it in a larger roasting pan filled with 1 inch of hot water). This prevents cracking in the cheesecake center. A stand mixer (like the KitchenAid Artisan) handles larger batches effortlessly.
For presentation, a pie server (like the Wilton) ensures clean slices every time. Store leftovers in an airtight container (I use Glasslock) to maintain freshness. 💫
Nutrition facts
Frequently asked questions
Can I make this without a lattice crust?
If lattice feels too advanced, simply arrange the apple slices in a single layer on top of the cheesecake filling. Brush them lightly with egg wash and bake as directed. For extra flavor, sprinkle with ½ cup chopped nuts or a dusting of cinnamon-sugar before baking. The apples will caramelize beautifully while staying contained.
How do I prevent the cheesecake from cracking?
Cracking happens when the cheesecake cools too quickly. First, let it cool completely at room temperature for 2 hours before refrigerating. Then chill it on the bottom shelf of the fridge for even cooling. Avoid opening the oven door early—this causes temperature fluctuations. If cracks appear, cover them with whipped cream or caramelized apples!
What's the best apple variety for this recipe?
Honeycrisp or Granny Smith work perfectly—they hold their shape while caramelizing. For a sweeter flavor, use Fuji or Gala. Avoid overly soft varieties like McIntosh, as they'll turn mushy. Always peel and slice apples just before baking to prevent browning. If using pre-sliced apples, pat them dry thoroughly to avoid a soggy crust.
Can I make this ahead of time?
Yes! Assemble the entire dessert (including unbaked apples) and refrigerate for up to 24 hours before baking. For longer storage, bake the crust and cheesecake filling, then chill. Add the apples just before the final 15 minutes of baking. The flavors develop beautifully overnight—this dessert tastes even better the next day!
Why is my pastry crust soggy?
A soggy crust usually means the cheesecake filling wasn't fully set before adding the apples. Bake the crust and cheesecake filling first (without apples) for 25 minutes at 350°F, then add the apples and bake the remaining time. Also ensure your butter was cold when mixing the dough—warm butter creates a tough, greasy crust.