
Desserts
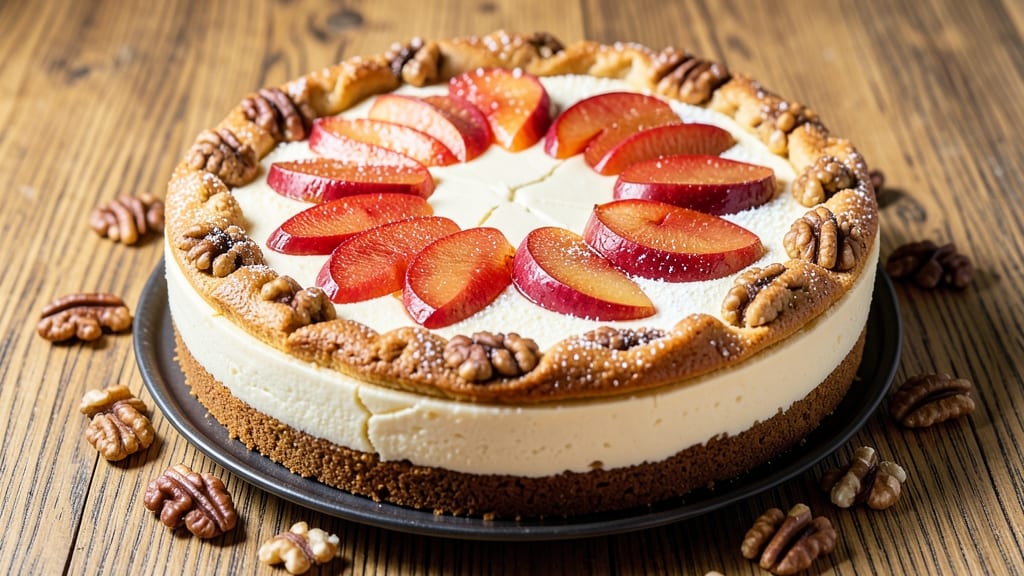
This apple walnut cheesecake recipe combines the creamy richness of classic cheesecake with the warm, spiced flavors of caramelized apples and toasted walnuts for a dessert that feels like autumn in every bite.
The secret lies in the layered textures—crispy nut crust, velvety filling, and a fruit topping that balances sweetness with just the right amount of tartness.
I developed this recipe after years of perfecting the balance between dense cheesecake and lighter fruit layers, ensuring each forkful delivers both comfort and sophistication.
The foundation starts with a buttery walnut crust that adds crunch without overpowering the creamy filling. The cheesecake itself is rich but not heavy, thanks to a mix of cream cheese, sour cream, and a touch of vanilla that keeps it light and tender.
What sets this apart is the caramelized apple-walnut topping, where sautéed apples and toasted walnuts create a perfect contrast to the smooth cheesecake beneath—spiced with cinnamon and a hint of nutmeg for warmth.
Baking in a water bath guarantees a smooth, crack-free texture, while chilling for at least 4 hours (or overnight) lets the flavors meld into harmony. The result? A dessert that’s elegant enough for guests but simple enough for weeknight cravings.
The walnuts add a satisfying crunch, the apples bring natural sweetness, and the cheesecake delivers that classic, creamy indulgence.
Serve this cheesecake at room temperature for the best texture—golden crust, creamy filling, and a topping that’s warm and inviting. It’s the kind of dessert that disappears quickly, leaving only crumbs and happy faces. Ready to bake?
Ingredients for apple walnut cheesecake
Layered textures and autumnal flavors start with these carefully chosen ingredients.
| Ingredient | Amount | Notes |
|---|---|---|
| Walnuts 🥜 | 1 ½ cups | Toasted, roughly chopped for crust |
| All-Purpose Flour 🌾 | ½ cup | For binding crust |
| Unsalted Butter 🧈 | ½ cup | Cold, cubed for crust |
| Granulated Sugar 🍚 | ¼ cup | For crust sweetness |
| Large Eggs 🥚 | 3 whole | Room temperature for filling |
| Cream Cheese 🧀 | 16 oz | Full-fat, room temperature |
| Sour Cream 🥛 | ½ cup | Full-fat for creaminess |
| Granulated Sugar 🍚 | 1 cup | For filling sweetness |
| Vanilla Extract 🌿 | 2 tsp | Pure, high-quality extract |
| Apples 🍎 | 4 medium | Honeycrisp or Fuji, peeled |
| Granulated Sugar 🍚 | ¼ cup | For caramelizing apples |
| Cinnamon 🌶️ | 1 tsp | Ground, for apple topping |
| Ground Nutmeg 🌿 | ¼ tsp | Freshly grated preferred |
| Walnuts 🥜 | ½ cup | Toasted, chopped for topping |
| Salt 🧂 | ½ tsp | Fine sea salt for balance |
The walnuts are non-negotiable for that signature crunch. Trader Joe's or Costco sell them in bulk at the best prices, and toasting them in a dry pan until golden deepens their flavor dramatically. For the apples, Honeycrisp or Fuji varieties hold their shape beautifully when caramelized. Avoid Granny Smith unless you want a tart punch—this dessert needs balance. The cream cheese should be full-fat; Philadelphia brand is a safe bet, but any high-quality brand will work. Room-temperature eggs blend smoothly into the filling, so take them out 30 minutes before mixing.
No walnuts on hand? Pecans or hazelnuts work in a pinch, though the flavor will shift slightly. Substituting apples? Pears or peaches caramelize just as well, but adjust the sugar to taste. The cinnamon and nutmeg are essential for that warm autumnal spice, but if you're feeling adventurous, cardamom at half the amount adds a sophisticated twist. For the crust, if you're missing flour, almond flour works well—just add an extra tablespoon to compensate for its density. The butter must be cold when mixing with the nuts to prevent a greasy crust.
Toast the walnuts for the crust and topping separately—5 minutes for the crust, 3 minutes for the topping—to control the level of crunch. Store the crust components in an airtight container for up to 3 days, while the filling and topping should be assembled within 24 hours of baking for optimal texture. Once baked, the cheesecake keeps in the fridge for 5-6 days, though it's best enjoyed within the first 3. For make-ahead convenience, assemble the entire dessert (except topping) up to 24 hours ahead and refrigerate—add the warm topping just before serving.
Why You'll Love This Recipe
- No-Fuss Layers: I swear by this recipe because it’s basically a no-brainer. The crust? Just crushed walnuts and butter—no rolling, no stress. The filling’s smooth but gets that perfect set without needing a water bath (yes, I’ve tried, and it holds).
- Caramel-Kissed Crunch: That walnut crust isn’t just for looks—it’s ridiculously good. The toasted walnuts add a buttery crunch, while the apples (if you add them) caramelize right into the filling. Honestly, the first bite makes me forget it’s dessert.
- Weeknight or Holiday: Make it for a quick family dinner or pull it out for Thanksgiving—it works both ways. The walnuts bring sophistication, but the simplicity keeps it from feeling like a chore. My kids think it’s “fancy,” but it’s really just eggs, sugar, and a little patience.
- Leftovers? Better Than Day One: Between us, the cheesecake actually improves after sitting overnight. The flavors meld, the crust softens just enough, and it’s still rich—no sad, dry slices here. I’ve had it for breakfast (don’t judge) and it’s still a win.
Step-by-step instructions for apple walnut cheesecake
Master this layered dessert with a nutty crust and caramelized apple topping.
Prepare the Crust Mixture
In a food processor, pulse the 1.5 cups walnuts until they form a coarse meal—you want texture, not butter. Add the 0.5 cup all-purpose flour, 0.5 cup cold unsalted butter (cubed), 0.25 cup granulated sugar, and 0.5 teaspoon salt. Process until the mixture clumps together when pressed. The butter should be evenly distributed but still visible in small flecks.
Press this mixture firmly into a 9-inch springform pan, creating an even base. Use the bottom of a glass to compact it thoroughly. Chill in the refrigerator while you prepare the filling—this prevents melting during baking. The crust should be about ¼-inch thick and extend slightly up the sides of the pan.
Bake the Crust
Preheat your oven to 350°F. Bake the crust for 10 minutes until it begins to set at the edges. Remove from the oven and let it cool slightly—this prevents the filling from sinking when added. The crust should be firm enough to support the weight of the cheesecake without breaking.
While the crust bakes, prepare the filling by beating the 16 oz cream cheese and 0.5 cup sour cream together until completely smooth. This step is critical—any lumps will remain visible in the final dessert. Scrape down the sides of the bowl occasionally to ensure even mixing.
Mix the Cheesecake Filling
To the cream cheese mixture, add the 1 cup granulated sugar, 2 teaspoons vanilla extract, and the 3 room-temperature eggs one at a time. Mix just until combined after each addition—overmixing incorporates air, which can cause cracks. The batter should be thick but pourable, with a smooth, velvety consistency.
Pour the filling over the pre-baked crust, spreading it evenly to the edges. Tap the pan gently on the counter a few times to remove any air bubbles. Bake at 325°F for 45-50 minutes, until the edges are set but the center still jiggles slightly. The cheesecake should pull away from the sides of the pan when gently shaken.
Prepare the Apple Topping
While the cheesecake bakes, peel, core, and slice the 4 medium apples into ¼-inch thick rounds. Toss them with 0.25 cup granulated sugar, 1 teaspoon cinnamon, and 0.25 teaspoon ground nutmeg. Let them sit for 10 minutes to begin caramelizing slightly. This step enhances their natural sweetness and adds depth of flavor.
In a separate pan, cook the apple slices over medium heat for 5-7 minutes, stirring occasionally, until they soften and release their juices. The mixture should be tender but still hold its shape. Remove from heat and stir in the 0.5 cup toasted, chopped walnuts—these add a satisfying crunch that contrasts beautifully with the creamy filling.
Assemble and Finish
Remove the cheesecake from the oven and let it cool to room temperature. This gradual cooling prevents cracking. Once cooled, spread the apple-walnut mixture evenly over the top, pressing down gently to create a cohesive layer. Chill the cheesecake in the refrigerator for at least 4 hours, preferably overnight, to allow the flavors to meld.
Before serving, run a knife around the edge of the pan to loosen the cheesecake. Release the springform and slice into 8 equal servings. Each piece should reveal a perfectly balanced contrast: the nutty crust, silky filling, and caramelized apple topping with crunchy walnuts. Serve chilled for the best texture and flavor experience.
Pro Tips For Making Apple Walnut Cheesecake
- TOAST THE WALNUTS FIRST: I learned this the hard way—raw walnuts taste bitter in cheesecake, no matter how much sugar you add. Toss them in a dry skillet over medium heat for 3-4 minutes until golden and fragrant, then cool completely before folding into the batter. The extra effort makes the texture richer and the flavor pop.
- WHIP THE EGGS ROOM-TEMP: Cold eggs from the fridge won’t blend smoothly, and you’ll end up with lumps in that creamy filling. Pop them in a bowl of warm water for 5 minutes first—just enough to make them yield like butter. Trust me, your cheesecake’s silky texture depends on this small step.
- BAKE THE CRUST LONGER: That nutty crust needs time to crisp, not just brown. After the initial 10 minutes in the oven, pull it out, press down any puffed edges with a spoon, then return it for another 5 minutes. This guarantees a sturdy base that won’t turn to mush when you slice it later.
- USE A SPRINKLE OF FLOUR: The walnuts and apples will release moisture, making the crust soggy if you skip this. After pressing the crust into the pan, sprinkle a thin layer of all-purpose flour over the bottom—just enough to see it through the gaps. It’s the non-negotiable step that keeps your dessert from falling apart.
Wine and beer pairings for apple walnut cheesecake
Red Wine Pairings
An off-dry Riesling from Germany is my go-to choice—its crisp acidity and subtle honey notes complement the caramelized apples beautifully. Look for a Kabinett or Spätlese with just enough residual sweetness to mirror the dessert’s fruitiness. The slight tartness cuts through the cheesecake’s richness while enhancing the walnuts’ nuttiness. 🍷
White Wine Options
A Chardonnay with light oak aging works wonderfully, especially if it has a touch of vanilla from the barrel. I recommend a California Chardonnay or a Burgundy with bright citrus notes to balance the dessert’s creaminess. Avoid heavy, buttery Chardonnays—they’ll clash with the delicate apple flavors.
Dessert Red Wines
For a bolder pairing, try a Pinot Noir with a touch of fruitiness—think Oregon Willamette Valley or New Zealand. The red fruit notes harmonize with the apples, while the wine’s acidity keeps the palate fresh.
A lightly sweet Zinfandel from California also pairs surprisingly well, especially if it has berry undertones. 🍇
Beer Pairings
Craft Belgian witbiers like Hoegaarden or Stella Artois are fantastic choices—their citrusy, coriander notes refresh the palate between bites. For a richer option, a honey ale with caramel undertones mirrors the dessert’s sweetness. Avoid heavy stouts or IPAs, as they’ll overpower the delicate flavors.
Non-Alcoholic Options
Sparkling apple cider with a cinnamon stick is a perfect non-alcoholic match—its effervescence cleanses the palate while echoing the dessert’s apple-walnut theme. For something more indulgent, try sparkling pear nectar with a splash of vanilla syrup. Both options enhance the dessert’s autumnal vibes without alcohol. 🍏
Nutrition facts
Frequently asked questions
Can I make this cheesecake without a food processor?
For the crust, pulse the walnuts in a blender or chop them finely by hand with a knife. Mix the dry ingredients in a bowl, then cut in the cold butter with a pastry cutter or your fingers until the mixture resembles coarse crumbs. The texture will be slightly less uniform but still delicious.
How do I prevent cracks in the cheesecake?
Cracks happen when air gets trapped or the cheesecake cools too quickly. Start by tapping the pan on the counter to release air bubbles before baking. Avoid overmixing the filling—just combine until smooth. Bake at 325°F (not higher) and let it cool gradually in the oven with the door slightly open for 15 minutes after baking. The water bath also helps maintain moisture.
Can I use a different type of apple?
Yes, but choose apples with good texture and flavor. Honeycrisp or Fuji work best—they caramelize beautifully and hold their shape. Tart varieties like Granny Smith will make the topping too acidic, while overly soft apples (like McIntosh) may turn mushy. If using pears, reduce the sugar to 0.125 cup since they're naturally sweeter.
Is it necessary to chill the cheesecake overnight?
While overnight chilling gives the best texture and flavor melding, you can serve it after 4 hours if needed. The cheesecake will still be delicious, though the layers may not be as perfectly set. For a quicker option, bake the crust and filling a day ahead, then assemble and chill the topping just before serving.
How can I make this recipe gluten-free?
Replace the all-purpose flour in the crust with 0.5 cup gluten-free 1:1 baking flour (like Bob's Red Mill). For the filling, ensure your cream cheese and vanilla extract are certified gluten-free. The walnuts are naturally gluten-free, but always check packaging. The texture will be slightly different but still delicious.