
Desserts
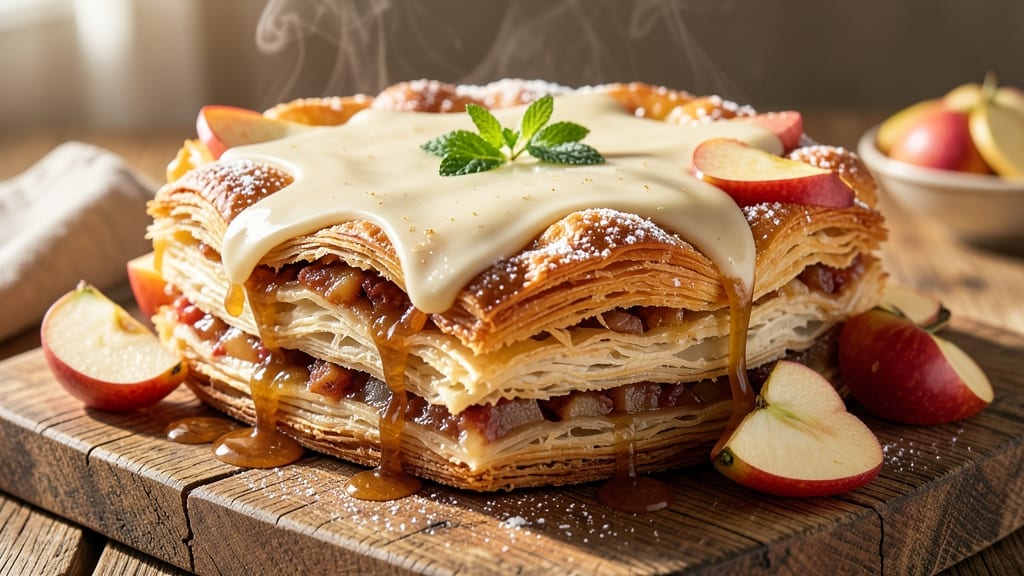
This apple turnover cake delivers flaky, golden layers that combine the best of pie and cake—all in one perfect bite. The secret lies in a tender cake base wrapped around a spiced apple filling that caramelizes beautifully during baking.
I’ve perfected this recipe to balance crisp edges with a tender center, ensuring every slice feels like a warm hug from your favorite bakery.
The cake itself is simple yet impressive, using basic pantry staples like flour, sugar, and baking powder to create a light, buttery texture. Meanwhile, the apple filling—sweetened with cinnamon, nutmeg, and a touch of brown sugar—transforms into a sticky, caramelized center that melts at the first forkful.
Baking at 375°F ensures the cake rises just enough to hold its shape while keeping the filling gooey.
What makes this recipe stand out is the harmony of textures: the flaky cake crust contrasts with the soft, spiced apples, while the caramelized filling adds depth. It’s the kind of dessert that feels special enough for company but easy enough for a weeknight treat.
Serve warm with vanilla ice cream or a drizzle of caramel for the ultimate indulgence.
For extra flair, you can add a streusel topping or a light glaze—though the cake shines on its own. Whether you’re baking for a gathering or just craving something comforting, this apple turnover cake delivers restaurant-quality results with minimal effort. Let’s get baking!
Ingredients for apple turnover cake
These simple yet magical ingredients create a flaky, golden turnover cake with caramelized apple filling.
| Ingredient | Amount | Notes |
|---|---|---|
| All-Purpose Flour 🌾 | 2 ½ cups | Sifted for flaky texture |
| Granulated Sugar 🍬 | 1 ¼ cups | White or light brown |
| Unsalted Butter 🧈 | 1 cup | Cold, cubed for flakiness |
| Large Eggs 🥚 | 2 whole | Room temperature |
| Baking Powder 🧂 | 2 tsp | Aluminum-free preferred |
| Salt 🧂 | ½ tsp | Fine sea salt |
| Vanilla Extract 🌸 | 1 tsp | Pure extract preferred |
| Apples 🍎 | 4 medium | Peeled, cored, sliced |
| Light Brown Sugar 🍬 | ½ cup | Packed, for filling |
| Ground Cinnamon 🌿 | 2 tsp | Freshly ground preferred |
| Ground Nutmeg 🌿 | ½ tsp | Freshly grated better |
| Lemon Juice 🍋 | 1 tbsp | Freshly squeezed |
| All-Purpose Flour 🌾 | ¼ cup | For dusting |
| Vanilla Ice Cream 🍦 | 1 cup | For serving (optional) |
The butter is non-negotiable here—cold, cubed cubes create those signature flaky layers. Plugrá brand is my go-to for baking, but any high-fat unsalted butter works. The apples? Granny Smith or Honeycrisp hold their shape best—they won’t turn mushy. I always peel and slice them just before baking so they stay crisp. For the filling, light brown sugar adds that perfect caramel depth, but white sugar works in a pinch. The vanilla extract should smell strong—if it’s faint, you’re using imitation.
No vanilla extract? Vanilla bean paste works too, or even a scraped vanilla bean. Short on apples? Substitute with 3 cups of mixed fruit—pears, berries, or even canned pineapple (drained well). The nutmeg is key—it’s what gives that warm, cozy spice. If you only have whole nutmeg, grate it fresh for maximum flavor. For the cake batter, don’t overmix—just combine until the dry ingredients are just incorporated. The filling can be prepped ahead and stored in the fridge for 2 days—perfect for making this a day ahead.
This cake keeps beautifully for 3 days at room temperature, wrapped in foil, or 1 week in the fridge. Reheat slices in the oven at 350°F for 5-10 minutes to restore that warm, gooey center. I always make a double batch—one for dinner guests and one for breakfast the next morning. The ice cream pairing? Homemade vanilla is ideal, but store-bought works too. Just let the cake cool completely before serving—patience ensures those perfect flaky layers.
Why You'll Love This Recipe
- No-Fuss Layers: I swear by this recipe because it’s basically a cake and a turnover in one—no fancy folding or rolling required. Just mix the dough, layer in the apples, and let the butter and sugar do the magic while it bakes.
- Butter-Sugar Magic: That rich, caramelized apple filling? It’s the star, but honestly, the crispy golden crust from the melted butter and sugar is what makes me reach for seconds. The eggs bind it all together so it stays moist—no dry cake here.
- Weeknight Hero: Between us, this is my go-to when I need something impressive but zero stress. Serve it warm with a scoop of ice cream for dessert, or slice it up for breakfast the next morning. (Yes, even on a Tuesday night.)
- Budget-Friendly Crowd-Pleaser: Five simple ingredients, one pan, and enough servings to feed a family or save for lunch. The flour and sugar stretch far, and the butter adds that luxurious touch without breaking the bank. Leftovers? They vanish faster than you can say "second slice."
Step-by-step instructions for apple turnover cake
Here's how to create that perfect balance of crispy, flaky layers and tender, caramelized apple filling.
👨🍳 Step 1: Make the Flaky Pastry Dough
In a large bowl, combine the 2.5 cups all-purpose flour, 2 tsp baking powder, and 0.5 tsp salt. Whisk gently to distribute evenly. Cut in the 1 cup cold unsalted butter using a pastry cutter or your fingers until the mixture resembles coarse crumbs with pea-sized butter pieces. This cold butter is crucial—it creates those beautiful flaky layers when baked.
Make a well in the center and add the 2 whole large eggs and 1 tsp vanilla extract. Mix carefully with a fork until just combined, then add 1 tbsp ice water if the dough seems too dry. Gather the dough into a ball, wrap in plastic, and chill in the refrigerator for 30 minutes. This resting period relaxes the gluten and makes rolling easier.
🍳 Step 2: Prepare the Caramelized Apple Filling
While the dough chills, peel, core, and slice the 4 medium apples into ¼-inch thick rounds. Toss them in a bowl with 0.5 cup light brown sugar, 2 tsp ground cinnamon, 0.5 tsp ground nutmeg, and 1 tbsp lemon juice. This mixture prevents browning and infuses the apples with warm spices. Let them sit for 10 minutes while you prepare the baking dish.
Preheat your oven to 375°F. Lightly grease a 9-inch round cake pan or 8-inch square pan with butter or oil. Dust the bottom with 0.25 cup all-purpose flour, tapping out any excess. This prevents sticking and adds to that signature flaky texture.
🥘 Step 3: Assemble and Bake the Turnover Cake
Roll out the chilled dough on a lightly floured surface to fit your pan with about 1-inch overhang. Gently fold the edges inward to create a neat border. Spoon the apple filling into the center, mounding it slightly. The filling should be 2-3 inches thick—this ensures proper caramelization without overflowing.
Fold the dough edges over the filling to completely enclose it, pressing gently to seal. Brush the top with a bit of egg wash (1 egg beaten with 1 tbsp water) for a golden finish. Bake for 45-50 minutes until the top is deep golden brown and the filling is bubbling at the edges. A toothpick inserted should come out clean.
⏰ Step 4: Rest and Serve
Remove the cake from the oven and let it cool in the pan for 15 minutes. This resting period allows the filling to set slightly and prevents crumbling when you transfer it. Run a knife around the edges to loosen, then invert onto a serving plate.
Serve warm with a scoop of 1 cup vanilla ice cream on the side or dolloped on top. The contrast of warm spiced apples with cool vanilla ice cream is pure magic. For extra flair, dust with powdered sugar or drizzle with caramel sauce—just don't skip the ice cream!
Pro Tips For Making Apple Turnover Cake
- Chill the Dough First: I learned this the hard way—rolling out cold dough is a nightmare. Wrap the dough in plastic and refrigerate it for at least 30 minutes before shaping. This keeps it from sticking to the rolling pin and makes cutting out the circles way easier, especially when you’re in a hurry.
- Cut Butter in Small Batches: Using cold, cubed butter straight from the fridge is key, but don’t try to mix it all at once. Work in 2-3 tablespoon chunks at a time, pulsing the food processor or cutting by hand until you get pea-sized crumbles. If the butter melts into a greasy mess, you’re overworking it—and that’s a fast track to a dense, greasy cake.
- Don’t Overfill the Turnovers: This isn’t a pie—less filling is better. Fill each pastry circle with about 2 tablespoons of apple mixture, then fold and seal tightly. Overstuffing makes them burst open in the oven or turn soggy. If your apples are juicy, pat them dry first or sprinkle a pinch of cornstarch in the filling to soak up excess moisture.
- Use a Parchment Slip: Skip the greased pan and save yourself cleanup time. Cut a sheet of parchment paper to fit your baking dish, then place the assembled turnovers on top. The paper prevents sticking without needing extra butter or flour, and you can just lift the whole thing out when it’s done. (Yes, even if you’re impatient like me.)
Common mistakes when making great apple turnover cake
Overmixing the Dough
The most common mistake is overworking the dough when combining the flour and butter. Once those cold butter cubes melt during baking, they create steam pockets for flaky layers—but only if they stay intact.
When you overmix, you develop gluten too early, which makes the final cake dense instead of tender. I always use a pastry cutter or my fingers to work the butter in just until pea-sized pieces remain.
Stop mixing as soon as the dough comes together—no need to make it perfectly smooth. 🧈
Skipping the Chill Time
Rushing the 30-minute chill is another big mistake. Cold butter needs time to relax and firm up properly. Without chilling, the dough becomes sticky and difficult to roll out evenly. I’ve seen home bakers skip this step and end up with uneven layers or even dough that tears when folding.
Trust me, that extra half-hour in the fridge makes all the difference in the final texture. ❄️
Using Warm Butter
Never, ever use warm or softened butter for this recipe. The temperature of your butter directly affects the flakiness. Warm butter melts too quickly, creating large steam pockets that can make the cake rise unevenly or even collapse.
I keep my butter in the freezer for 15 minutes before using it, then cut it into 1-inch cubes right before mixing. This ensures those perfect flaky layers every time. 🥶
Overfilling the Cake
Too much filling can cause the cake to overflow during baking, creating a messy presentation and potentially underbaked edges. The filling should be 2-3 inches thick in the center—any more risks spillage.
I like to mound the apples slightly in the middle and then fold the dough edges neatly over them. This creates a beautiful dome shape while keeping everything contained. 🍎
Not Preheating the Pan
Many bakers forget to preheat their pans properly, which can lead to uneven baking. The pan should be at the same temperature as your oven when you add the dough. I always place my greased pan in the oven while it preheats, then remove it just before adding the dough.
This helps create that perfect golden crust from the moment it hits the heat. 🔥
Opening the Oven Too Soon
The biggest temptation is checking on your cake too early. Resist the urge to peek! Opening the oven door causes temperature fluctuations that can make the cake sink or develop a pale, uneven crust. Wait until the full 45-50 minutes are up before checking.
The cake will give you visual cues when it's done—deep golden brown and bubbling filling at the edges. Patience pays off with that perfect texture. 💫
Nutrition facts
Frequently asked questions
Can I make this apple turnover cake ahead of time?
This dessert actually tastes even better the next day. Bake it as directed, then store it at room temperature wrapped in foil for 2-3 days. For longer storage, refrigerate for up to 1 week—just reheat slices in the oven at 350°F for 5-10 minutes to restore that warm, gooey center. The flavors deepen overnight!
What's the best way to prevent a soggy bottom?
Prevent sogginess by ensuring your pan is properly preheated and your dough is fully chilled before baking. Dust the bottom of your pan with flour before adding the dough—this creates a barrier between the cake and pan. Also, let the cake cool in the pan for 15 minutes before inverting to help set the filling.
Can I use store-bought puff pastry instead?
Yes, but with one important adjustment! Store-bought puff pastry works beautifully, but it's much thinner than homemade dough. Use 1 sheet (about 12x17 inches) and fold it in half to create a thicker layer. This prevents the filling from tearing through during baking. Just brush with egg wash before baking as directed.
How do I make this recipe gluten-free?
For a gluten-free version, substitute the all-purpose flour with a 1:1 gluten-free baking flour blend (like Bob's Red Mill). Add 0.5 tsp xanthan gum to the dry ingredients to improve texture. For the filling, use gluten-free oats if making a streusel topping. Note that gluten-free versions may be slightly denser but still delicious!
Can I make individual apple turnovers instead?
Divide the dough into 8 equal portions and roll each into a 4-inch circle. Spoon 2-3 tbsp filling into each, fold over, and seal the edges. Place on a baking sheet and bake at 375°F for 20-25 minutes until golden. These make perfect single servings or party appetizers!