
Breakfast & Brunch
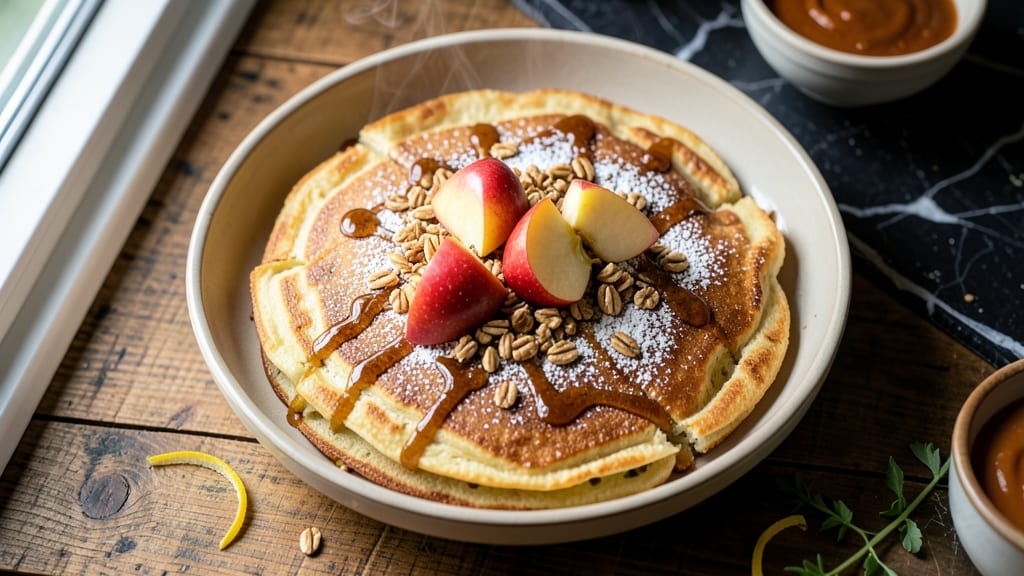
This apple oven pancake recipe transforms weekend breakfasts into a warm, spiced masterpiece with tender pancakes and caramelized apple streusel. The secret lies in a simple batter that bakes into fluffy layers, while the cinnamon-spiced apple topping creates pockets of sweet, jammy goodness that'll have everyone reaching for seconds.
I developed this recipe after years of testing—no flipping required, just one pan and 30 minutes of oven time.
The magic happens in two layers: a classic pancake batter with baking powder for lift, and a streusel topping of oats, brown sugar, and diced apples that caramelizes beautifully while baking. The apples soften just enough to release their natural sweetness, while the streusel stays slightly crisp on top.
This isn't your typical pancake—it's more like a cross between a Dutch baby and apple crisp, with a texture that's both tender and satisfying.
What you'll end up with is a golden, bubbling stack that smells like autumn in a kitchen—warm spices, caramelized apples, and that buttery pancake aroma that makes mornings feel special. The best part?
It keeps well in the fridge for 3 days, so you can make a big batch and enjoy it all week. Serve with maple syrup, whipped cream, or a dollop of vanilla ice cream for the full experience.
Perfect for brunch gatherings, weekend family meals, or when you want to impress without spending hours in the kitchen. The recipe scales easily too—just double the batter and topping for a crowd. Let's get baking!
Ingredients for apple oven pancake
Pantry staples plus a few fresh apples—this recipe delivers autumn in every bite.
| Ingredient | Amount | Notes |
|---|---|---|
| All-Purpose Flour 🌾 | 2 cups | Sifted for fluffy texture |
| Granulated Sugar 🍚 | ½ cup | White or light brown |
| Baking Powder 🧂 | 2 tsp | Freshly opened for lift |
| Salt 🧂 | ½ tsp | Fine sea salt preferred |
| Large Eggs 🥚 | 2 whole | Room temperature for blending |
| Milk 🥛 | 1 ½ cups | Whole milk for richness |
| Unsalted Butter 🧈 | ½ cup | Melted, cooled slightly |
| Vanilla Extract 🌸 | 1 tsp | Pure vanilla preferred |
| Apples 🍎 | 2 whole | Peeled, diced (about 2 cups) |
| Old-Fashioned Rolled Oats 🥣 | ½ cup | Not quick oats |
| Light Brown Sugar 🍚 | ¼ cup | Packed, not leveled |
| Ground Cinnamon 🌿 | 1 tbsp | Freshly ground preferred |
| Allspice 🌶️ | ½ tsp | Optional for depth |
| Maple Syrup 🍁 | ¼ cup | For serving or drizzling |
The apples make or break this recipe. Honeycrisp or Fuji stay firm enough to caramelize without turning mushy—Granny Smith works too if you want more tartness. Most grocery stores carry these, but Trader Joe's has a great selection of organic options. Peel them first (the skin gets tough when baking), then dice into small, even pieces. About 2 cups total is perfect—don't skimp, the flavor comes from them. If you're using pre-cut apples from the salad bar, pat them dry first to avoid a soggy streusel.
No vanilla extract? Vanilla bean paste or even a scraped vanilla bean works in a pinch. Short on oats? Crushed graham crackers or panko add a nice crunch. The baking powder is non-negotiable—don't use baking soda unless you want pancakes that taste like soap. For the streusel, light brown sugar is key—it's sweeter and helps caramelize. If you can't find allspice, nutmeg at half the amount gives a similar warmth. The maple syrup should be Grade B for that rich, robust flavor—Wysocki or Coos Bay are my go-tos, but any quality syrup works.
The batter keeps for 2 days in the fridge—just whisk before baking. The streusel topping can be prepped ahead and stored separately for 3 days. For make-ahead magic, bake the pancakes, cool completely, then freeze between parchment paper. Reheat in a 350°F oven for 10-15 minutes until warmed through. Pro tip: Double the batter and bake in batches—they reheat beautifully. Serve with extra maple syrup or a scoop of vanilla ice cream for the full experience.
Why You'll Love This Recipe
- No-Fuss Mixing: I swear by this batter—just whisk, no rolling, no folding. The flour, sugar, and baking powder blend into a smooth, thick consistency that pours like a dream, and the eggs hold it together without needing a stand mixer. Honestly, I’ve made it while chatting on the phone.
- Caramelized Apple Magic: That first bite of warm pancake with tender, slightly spiced apple chunks? It’s like autumn in a bite. The sugar in the batter caramelizes the apples right in the oven, turning them into sweet, chewy pockets—no extra syrup needed.
- Breakfast or Dessert: Serve it with butter and maple syrup for a weekend brunch, or dust with cinnamon sugar and a dollop of whipped cream for a cozy dessert. My kids ask for it after school snacks, and my husband sneaks seconds at dinner. It’s that good.
- Budget Breakfast Win: Five basic ingredients stretch to feed four, and leftovers reheat beautifully. I’ve had these cold pancakes for lunch the next day—still delicious, still satisfying. Plus, the sugar and flour are pantry staples, so you’re not scrambling for obscure items.
Step-by-step instructions for apple oven pancakes
Here's how to create fluffy, caramelized apple pancakes that stack beautifully.
Prepare the Apple Streusel Filling
In a medium bowl, combine the 0.5 cup old-fashioned rolled oats, 0.25 cup light brown sugar, 1 tbsp ground cinnamon, and 0.5 tsp allspice. Mix until evenly distributed—this creates the perfect crunchy topping. In a separate small bowl, dice the 2 whole apples into small, even pieces (about ¼-inch cubes). You want them small enough to soften during baking but still retain some texture.
Set aside both mixtures. The oat streusel should look like coarse crumbs with visible cinnamon flecks, and the apple pieces should be uniform in size. This ensures even caramelization throughout the pancakes. If you're using a particularly juicy apple variety, you might want to toss the diced apples with a pinch of salt to help draw out excess moisture before mixing with the streusel.
Mix the Pancake Batter
In a large mixing bowl, whisk together the 2 cups all-purpose flour, 0.5 cup granulated sugar, 2 tsp baking powder, and 0.5 tsp salt. Sift the dry ingredients first to prevent lumps in your batter—this is key for achieving that light, fluffy texture. In a separate bowl, melt the 0.5 cup unsalted butter and let it cool slightly (it should be warm to the touch but not hot).
Add the melted butter, 2 whole large eggs, 1.5 cups milk, and 1 tsp vanilla extract to the dry ingredients. Mix with a whisk or electric mixer on low speed until just combined—you should still see small flour streaks. Overmixing develops gluten, which makes pancakes tough. The batter should be thick but pourable, similar to traditional pancake batter. If it's too thick, add an extra tablespoon of milk to help it spread evenly in the oven.
Combine Batter and Filling
Gently fold half of the diced apples into the pancake batter using a spatula, being careful not to overmix. Then, sprinkle half of the oat streusel mixture over the batter and fold just until combined. Repeat with the remaining apples and streusel. The goal is to distribute the filling evenly throughout the batter while keeping the streusel chunks intact. This creates pockets of caramelized apple and crunchy oats in every bite.
Here's the thing—don't worry if it looks like too much filling. The batter will still spread nicely in the oven, and the apples will soften as they bake. For best results, let the batter rest for 10 minutes at room temperature while you preheat your oven. This allows the flour to fully hydrate and the baking powder to activate, ensuring maximum fluffiness when they bake.
Bake the Pancakes
Preheat your oven to 375°F and grease a 9-inch round cake pan or similar baking dish with butter or nonstick spray. Pour the batter evenly into the prepared pan and smooth the top with a spatula. Bake for 30-35 minutes, until the edges are golden brown and a toothpick inserted in the center comes out clean. The pancakes should rise slightly in the center but still be soft and tender.
About halfway through baking (after 15-20 minutes), you'll notice the top starting to brown. This is when the magic happens—the apples begin caramelizing and the streusel turns golden and crispy. If the top browns too quickly, tent the pan with aluminum foil to prevent over-browning while allowing the center to finish cooking. The pancakes are done when they pull away slightly from the edges of the pan and have a beautiful caramelized sheen on top.
Serve Warm with Maple Syrup
Remove the pancakes from the oven and let them cool in the pan for 5 minutes. Then, carefully transfer them to a serving plate. The pancakes should be soft and fluffy in the center with caramelized apple pieces and crispy streusel on top. For serving, drizzle with the 0.25 cup maple syrup and cut into wedges. The warm syrup will melt slightly, creating a delicious sauce that complements the caramelized apples.
I like to serve these apple oven pancakes immediately while they're still warm and gooey. The contrast between the soft pancake, caramelized apples, and crispy streusel makes every bite exciting. Pair them with a dollop of whipped cream or a scoop of vanilla ice cream for an extra-special breakfast or brunch treat. The pancakes will keep well in an airtight container at room temperature for up to 2 hours, but they're best enjoyed fresh out of the oven.
Pro Tips For Making Apple Oven Pancake
- Preheat Pan to Medium-High: I learned this the hard way—low heat makes your oven pancakes gummy. Crank that pan to medium-high, then adjust if it browns too fast. You want caramelized edges, not burnt spots.
- Grate Apples, Don’t Dice: I was skeptical until I tried it—grated apples blend into the batter better and release juice evenly. Skip the knife; a box grater saves time and keeps the texture smooth.
- Mix Dry Ingredients First: This isn’t the prettiest method, but it’s the tastiest. Whisk flour, sugar, baking powder, and salt together before adding wet ingredients. It prevents lumps and guarantees a fluffier pancake.
- Use Cold Butter in Batter: Yes, even if you're impatient like me—cold butter creates pockets for steam, giving you a tender crumb. Cut it into small cubes and fold it in last, resisting the urge to melt it first.
Best sauces and condiments for apple oven pancake
Maple-Glaze Finish
Warm Grade B maple syrup to 160°F in a small saucepan, then brush over the baked pancakes while still hot. The syrup caramelizes slightly, creating a glossy finish that ties all the flavors together.
I like to add a pinch of sea salt to enhance the sweetness—it’s a trick I picked up from French patisserie techniques. For extra richness, drizzle with brown butter after brushing the syrup. 🍁
Caramel Apple Sauce
Simmer 1 cup apple cider, 2 tbsp brown sugar, and 1 tsp cinnamon until reduced by half, then blend with a hand mixer for a silky texture. This sauce adds moisture and balances the pancakes' crispy streusel.
Store in the fridge for up to 5 days—perfect for quick reheating in the microwave. For a boozy twist, add 1 tbsp bourbon while simmering. 🍎
Whipped Cream Variations
Classic heavy whipping cream with a pinch of vanilla bean is foolproof, but try these twists: fold in 1 tbsp lemon curd for tangy brightness or mix in ½ tsp cardamom for Middle Eastern flair.
For a lighter option, whip Greek yogurt with 1 tsp honey and a splash of almond milk. Chill all toppings before serving to prevent melting. 🥛
Nut Butter Swirl
Mix 2 tbsp almond or peanut butter into the batter before baking, then swirl in a few spoonfuls of honey after pouring into the pan. The nutty depth pairs perfectly with the apples, and the honey adds a natural sweetness.
For extra decadence, top with chopped walnuts before baking. This works especially well with tart apple varieties like Granny Smith. 🌰
Spiced Yogurt Dip
Whisk 1 cup Greek yogurt with 1 tsp cinnamon, ½ tsp ginger, and 1 tbsp maple syrup**. This tangy dip cuts through the richness and adds protein.
For a creamy texture, strain the yogurt through a cheesecloth-lined sieve for 30 minutes before mixing. Serve in small bowls alongside the pancakes for dipping. 🥄
Nutrition facts
Frequently asked questions
Why do my apple oven pancakes turn out dense instead of fluffy?
Overmixing the batter develops gluten, which makes the pancakes tough. Whisk just until combined—you should still see small flour streaks. Also, make sure your baking powder is fresh (old baking powder loses lift) and don't skip the 10-minute rest before baking. The batter needs time to hydrate properly for maximum fluffiness.
Can I use frozen apples instead of fresh?
Yes, but thaw and drain them first to prevent a soggy streusel. Pat them completely dry with a paper towel before dicing. Frozen apples work best in this recipe because they're pre-peeled and have consistent texture. Just avoid varieties with added sugar or syrup.
How do I make these pancakes ahead of time?
Bake them completely, then cool to room temperature. Store in an airtight container for up to 3 days at room temp or 1 month in the freezer. Reheat in a 350°F oven for 10-15 minutes until warmed through. For best results, reheat one stack at a time to maintain crispiness.
What's the best apple variety for this recipe?
Honeycrisp or Fuji apples stay firm enough to caramelize without turning mushy. Granny Smith works well if you prefer tartness. Avoid overly soft varieties like Red Delicious—they'll make the pancakes soggy. For extra flavor, use a mix of sweet and tart apples.
Can I make this recipe gluten-free?
Yes, but you'll need a 1:1 gluten-free flour blend and add ½ tsp xanthan gum to improve texture. Also increase the milk by 2 tbsp since gluten-free flours absorb more liquid. The baking time may need adjustment—watch closely after 25 minutes as gluten-free batters can dry out faster.