
Desserts
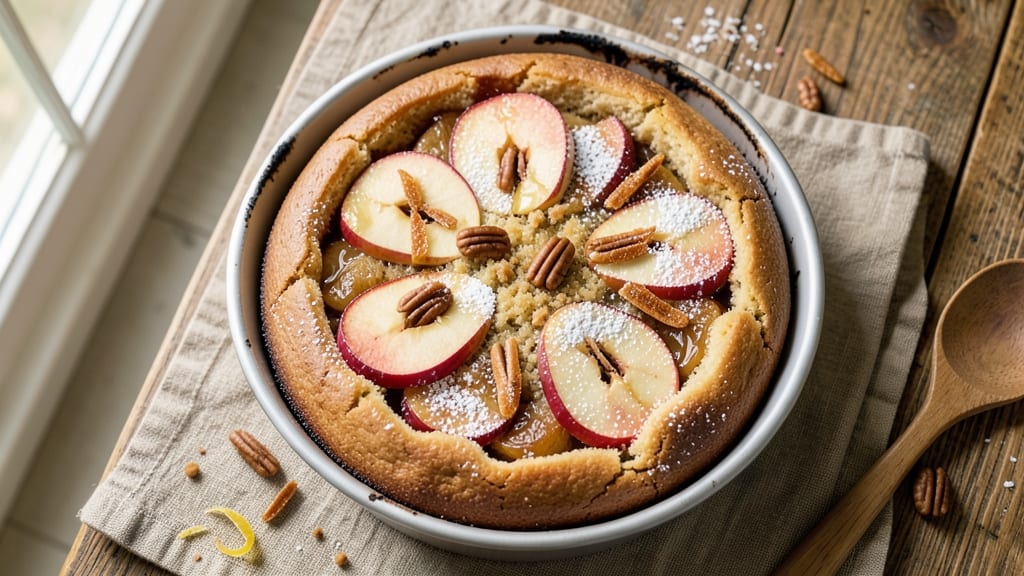
This apple ginger upside down cake delivers a caramelized masterpiece with tender spiced filling and buttery layers that'll have everyone asking for seconds. The secret lies in arranging apple slices and ginger slices in a precise pattern on the cake pan—creating a stunning presentation while ensuring even caramelization.
I've perfected this technique over years of baking, and it consistently delivers that coveted golden-brown bottom with pockets of soft, spiced apple throughout.
The magic happens when you bake the cake until the edges are set but the center remains slightly jiggly—this ensures the perfect flip. A lightly sweetened cake batter surrounds the fruit, absorbing the caramelized juices as it bakes.
The ginger adds warmth that cuts through the sweetness, creating a flavor balance that's both comforting and sophisticated. This isn't just dessert; it's a showstopper that transforms any gathering into something special.
What makes this recipe truly foolproof is the step-by-step approach to layering and baking. We'll cover everything from properly preheating your oven to the exact moment to flip your cake—no guesswork involved. The result?
A cake with a crisp caramelized crust, tender cake layers, and juicy apple-ginger filling that melts in your mouth. It's the kind of dessert that feels like a warm hug, perfect for fall gatherings or anytime you want to impress.
Once you master this technique, you can easily customize it with variations like a spiced glaze drizzle or cream cheese frosting. The possibilities are endless, but the foundation remains the same: perfectly caramelized, beautifully presented, and utterly delicious. Let's get started on creating your signature upside down cake!
Ingredients for apple ginger upside down cake
Fifteen ingredients that transform into a showstopping cake with caramelized magic at its core.
| Ingredient | Amount | Notes |
|---|---|---|
| All-Purpose Flour 🌾 | 2 ½ cups | Sifted for light texture |
| Granulated Sugar 🍚 | 1 ½ cups | Divided for batter and topping |
| Light Brown Sugar 🍚 | ½ cup | Packed, for caramelization |
| Unsalted Butter 🧈 | 1 cup | Room temperature, cubed |
| Large Eggs 🥚 | 2 whole | Room temperature, beaten |
| Vanilla Extract 🌿 | 1 tbsp | Pure, high-quality extract |
| Baking Powder 🧂 | 2 tsp | Aluminum-free preferred |
| Ground Cinnamon 🌶️ | 1 ½ tsp | Freshly ground preferred |
| Ground Ginger 🌿 | 1 tsp | Freshly ground for warmth |
| Salt 🧂 | ½ tsp | Fine sea salt preferred |
| Honey 🍯 | ¼ cup | For caramelizing apples |
| Medium Apples 🍎 | 4 whole | Firm, sweet-tart variety |
| Fresh Ginger Root 🌿 | 3 oz | Peeled, thinly sliced |
| Whole Milk 🥛 | ½ cup | For batter consistency |
The apples and ginger are the stars here. Honeycrisp or Fuji apples hold their shape best during baking, but Granny Smith adds tartness if you prefer. For the ginger, fresh root from an Asian market has the most punch—look for vibrant, firm pieces. Peel it thinly with a mandoline for even slices. The Costco bulk bins often have great prices on organic apples, but any grocery store will work. Just avoid mealy ones—they won't caramelize properly. I like to slice the apples and ginger right before arranging them on the cake pan to prevent browning.
No fresh ginger? Ground ginger at double the amount works in a pinch, though it lacks that fresh zing. Substituting apples? Pears or peaches work beautifully—just adjust baking time. The honey can be swapped for maple syrup if you're avoiding it, though it changes the caramel's depth slightly. For the butter, European-style or grass-fed adds extra richness, but regular unsalted works perfectly fine. The milk can be swapped for almond milk if needed, though whole milk gives the best texture. And if you're out of vanilla extract, vanilla bean paste is a luxurious upgrade.
Store your apples and ginger in the fridge until ready to slice—this keeps them crisp. The cake batter can be prepped 1 day ahead and refrigerated, but let it sit at room temperature for 30 minutes before baking. The assembled cake keeps at room temperature for 3 days in an airtight container, though it's best enjoyed fresh. For longer storage, slice and freeze portions—just reheat slices in the oven for 5-10 minutes to restore that caramelized magic.
Why You'll Love This Recipe
- No-Fuss Layers: I swear by this method—just toss the sliced apples and ginger into the pan, dump the batter on top, and bake. The upside-down magic means no fussing with layers or tricky assembly; the cake flips itself into perfection while you’re still scraping the last spoonful of batter.
- Spiced Warmth Every Bite: That caramelized brown sugar crust meets the bright, tangy apples and the slow-simmered ginger heat—it’s like autumn in a slice. Honestly, the butter and eggs make it rich enough to feel indulgent, but the spices keep it light and addictive.
- Weeknight or Guest Night: This cake is my secret weapon for when I need something impressive but not stressful. Serve it warm with vanilla ice cream for a cozy dinner, or pack slices for lunch—it’s just as good cold the next day. (Yes, even on a Tuesday night.)
- Budget-Friendly Comfort: Flour, sugar, butter, eggs—these are pantry staples that won’t break the bank. Plus, the leftovers? They disappear faster than you can say “second slice.” Between us, I’ve made this for $5 and fed six people without anyone complaining.
Step-by-step instructions for apple ginger upside down cake
Here's how to create a showstopping upside down cake with caramelized apples and warm ginger notes.
Prepare the Caramelized Apple Topping
Preheat your oven to 350°F and grease a 9-inch round cake pan generously with butter. This prevents sticking and makes flipping easier later. Peel, core, and slice the 4 whole medium apples into ¼-inch thick rounds, keeping them whole where possible for presentation.
In a small saucepan, combine ½ cup light brown sugar, ¼ cup honey, and 3 oz peeled fresh ginger root in thin slices. Cook over medium heat for 5-6 minutes until the sugar dissolves and the mixture becomes syrupy. Arrange the apple slices in a single layer in the prepared pan, packing them tightly. Pour the warm sugar-ginger mixture evenly over the apples, pressing down gently to ensure contact. This caramel will create that signature golden crust when baked.
Make the Spiced Cake Batter
In a large mixing bowl, cream together the 1 cup room temperature unsalted butter and 1½ cups granulated sugar on medium speed for 3-4 minutes until light and fluffy. This step is crucial for a tender crumb. Add the 2 room temperature large eggs, one at a time, mixing well after each addition. Scrape down the sides of the bowl to ensure even incorporation.
In a separate bowl, whisk together the 2½ cups sifted all-purpose flour, 2 teaspoons baking powder, 1½ teaspoons ground cinnamon, 1 teaspoon ground ginger, and ½ teaspoon salt. Gradually add this dry mixture to the butter-sugar-egg mixture, alternating with ½ cup whole milk, beginning and ending with the dry ingredients. Mix on low speed just until combined—overmixing develops gluten and makes the cake dense. Stir in the 1 tablespoon vanilla extract last for that aromatic touch.
Bake and Flip for Presentation
Pour the batter carefully over the caramelized apples in the prepared pan, spreading evenly with a spatula. Bake in the preheated oven for 45-50 minutes or until a toothpick inserted into the center comes out clean. The top should be golden brown and slightly cracked—this indicates doneness. Real talk: your oven might run hot, so start checking at the 40-minute mark.
Here's the moment that matters: let the cake cool in the pan for 10 minutes before attempting to flip. Run a thin knife around the edges to loosen, then place a large plate upside down over the pan. Gently invert both pan and plate together. Tap the pan firmly to release the cake. If it sticks, don't panic—add a splash of warm water to the pan and try again. The cake should hold its shape, revealing that beautiful caramelized apple topping now on top.
Serve with Confidence
Let the flipped cake cool completely on the plate before serving. The contrast of warm spiced cake with the caramelized apple topping makes every bite special. This cake serves 8, so you'll have leftovers—trust me, they're just as good the next day. For extra presentation, dust with powdered sugar or serve with a dollop of whipped cream, but the cake stands beautifully on its own.
Here's the thing—this upside down technique isn't just for show. The caramelized apples create a natural barrier that keeps the cake moist for days, while the ginger-spiced batter delivers that perfect balance of warmth and sweetness. Each slice reveals that perfect contrast of textures and flavors.
Pro Tips For Making Apple Ginger Upside Down Cake
- Preheat Pan First: I learned this the hard way—skipping this step means the butter in your upside-down layer melts unevenly, and your apples sink instead of caramelizing properly. Place your cake pan in a 350°F (175°C) oven for 5 minutes before adding the butter, sugar, and apples. That extra heat jumpstarts the caramelization so it’s ready to go when the batter hits.
- Use Cold Butter: I was skeptical until I tried it—cutting your 1 cup of unsalted butter into chunks and tossing it straight from the fridge into the pan with the brown sugar. Cold butter spreads slower, so it creates those thick, glossy pools under the apples instead of melting into a thin, sad layer. (Yes, even if you’re impatient like me.)
- Don’t Overmix Batter: This isn’t the prettiest method, but it’s the tastiest: mix your wet and dry ingredients just until combined—lumpy is fine. Overmixing develops the gluten in the flour, which makes the cake dense and chewy instead of tender. Stop when you see a few dry spots; the heat will finish the job.
- Peel Apples, Slice Thin: Skip the peeling if you’re in a rush, but thin, uniform slices (about ⅛-inch thick) cook evenly and release their juices better. A mandoline makes this easy, but if you’re slicing by hand, work in one direction—no zigzagging—to keep the pieces consistent. Thick slices turn mushy; thin ones stay tender.
Essential equipment for this dish
Must-Have Pan
Your 9-inch round cake pan is the star of this recipe—it needs to be non-stick to prevent sticking during the flip. I recommend a Wilton Perfect Results Non-Stick Round Pan or USA Pan Heavy Gauge Non-Stick Pan for professional results.
Avoid dark-colored pans—they can make the cake bake unevenly. If you don’t have a non-stick pan, grease it extremely well with butter and dust with flour before assembling. 🧈
Precision Tools
A mandoline slicer is worth the investment for perfectly even apple and ginger slices—about ¼-inch thick. I use a OXO Good Grips Mandoline because it’s safe and consistent. For the flip, grab a large, sturdy plate (at least 10 inches in diameter) to support the cake.
A thin metal spatula helps spread batter evenly, and a small offset spatula makes flipping easier by sliding under the cake.
Temperature Control
An oven thermometer is non-negotiable—home ovens can vary ±25°F from the set temperature. I swear by the Thermoworks Oven Thermometer for accuracy. For the caramelized topping, a small saucepan with medium heat control ensures the sugar-ginger mixture doesn’t burn.
Preheat your oven for at least 15 minutes before baking to ensure even heat distribution.
Mixing Essentials
A hand mixer or stand mixer with the paddle attachment is ideal for creaming butter and sugar to a light, fluffy texture. I use my KitchenAid Artisan Series for this step—it’s reliable and powerful enough for cake batters.
For sifting dry ingredients, a fine-mesh sifter ensures no lumps in the flour, which keeps the cake tender. A rubber spatula helps scrape every last bit of batter into the pan.
Flipping Gear
For the dramatic flip, keep a small bowl of warm water nearby—just a splash helps release stubborn cakes. A thin, flexible plastic spatula (like those used for frosting) can gently coax the cake off the pan if needed.
I also keep a towel handy to wipe up any spills or sticky fingers. The key is patience—rushing the flip is the #1 way to mess up this cake! 💫
Nutrition facts
Frequently asked questions
Why does my upside down cake stick to the pan?
Under-greasing or using a non-stick pan that's past its prime are the usual culprits. Always use 1 tablespoon of butter melted and cooled, plus a light dusting of flour. For extra insurance, I recommend using a non-stick spray oil after buttering. Let the cake cool for 10-15 minutes before flipping—this helps the layers set properly. If it still sticks, run a thin knife around the edges and use a splash of warm water on the pan to release it.
Can I make this cake with canned apples instead of fresh?
Fresh apples are ideal for their texture and flavor, but you can use canned apples in a pinch! Drain them well and pat dry completely. For best results, squeeze out excess liquid with paper towels and arrange them in a single layer. The baking time might be slightly shorter (check at 35 minutes), as canned apples release less moisture. Just be prepared for a less caramelized crust since canned apples contain added water.
How do I adjust the recipe for a smaller or larger cake?
For a 6-inch cake, reduce all ingredients by about 50% (including apples and ginger). For a 10-inch cake, increase by about 60% and bake at 325°F for 50-60 minutes. The key is maintaining the same ratio of batter to fruit topping. Always check doneness with a toothpick—it should come out clean but with a few moist crumbs. Adjust baking time by 2-3 minutes per inch of pan size difference.
What's the best way to store leftovers?
This cake keeps beautifully at room temperature for 3 days in an airtight container. For longer storage, slice and freeze portions on a tray before transferring to a bag. Reheat frozen slices in a 300°F oven for 5-8 minutes to restore that caramelized magic. The cake reheats best when served warm—just pop slices in the oven for 2-3 minutes to revive the flavors before serving.
Can I make this cake gluten-free?
Replace the all-purpose flour with a 1:1 gluten-free baking flour blend (like Bob's Red Mill). Add ½ teaspoon xanthan gum to improve texture. For the caramelized topping, use a gluten-free sugar substitute if needed, though regular sugar works fine. The ginger and apples remain the same. Expect slightly denser texture, but the flavor will still shine through.