
Desserts
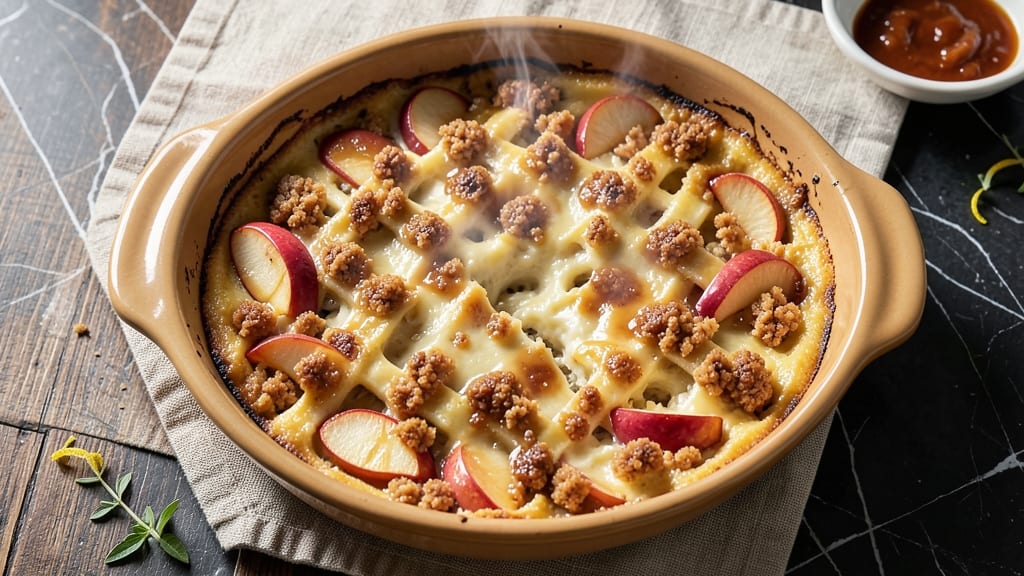
This apple cheesecake dump cake recipe combines two beloved desserts into one effortless masterpiece—buttery crust, creamy cheesecake filling, and spiced apple rivers all baked in one pan.
The magic happens when you layer pre-cooked apples and cheesecake batter over a simple crust, then let the oven work its magic for about 50 minutes. It’s the perfect dessert for busy hosts who want restaurant-quality results with minimal prep.
The secret to success lies in the proper layering of ingredients: a crumbly shortbread crust at the bottom, a thick layer of spiced apples (tender but not mushy), and a rich cheesecake filling that bakes into a silky, gooey center.
The apples release their juices during baking, creating those signature rivers of caramelized sweetness that cut through the creamy cheesecake. This dessert is foolproof—no cheesecake pan or tricky techniques required.
By the time it emerges from the oven, you’ll have a golden, bubbling cake with a crisp crust, a velvety cheesecake layer, and pockets of warm, spiced apples. The contrast of textures—crunchy crust, creamy filling, and tender fruit—makes every bite irresistible.
It’s the kind of dessert that feels indulgent but comes together in under 30 minutes of active prep. Perfect for potlucks, family dinners, or when you just want something sweet without the fuss.
Serve it warm with a scoop of vanilla ice cream or a drizzle of caramel sauce for extra decadence. The best part? Leftovers reheat beautifully, making this the ideal make-ahead dessert. Let’s get baking!
Ingredients for apple cheesecake dump cake
Buttery crust, spiced apples, and velvety cheesecake filling—just 14 ingredients for restaurant-worthy dessert magic.
| Ingredient | Amount | Notes |
|---|---|---|
| All-Purpose Flour 🌾 | 2 cups | For buttery crust texture |
| Unsalted Butter 🧈 | 1 cup | Cold, cubed for flaky crust |
| Granulated Sugar 🍚 | ½ cup | White sugar preferred |
| Brown Sugar 🍚 | ¼ cup | Light brown recommended |
| Large Eggs 🥚 | 2 whole | Room temperature for blending |
| Red Apples 🍎 | 4 medium | Honeycrisp or Fuji preferred |
| Cinnamon 🌿 | 2 tsp | Ground, not cassia |
| Ground Ginger 🌿 | 1 tsp | Freshly ground preferred |
| Salt 🧂 | ½ tsp | Diamond Crystal preferred |
| Vanilla Extract 🥛 | 1 tsp | Pure, high-quality |
| Cream Cheese 🧀 | 16 oz | Full-fat, room temperature |
| Sour Cream 🥛 | ½ cup | Full-fat for creaminess |
| Powdered Sugar 🍚 | ¼ cup | For final dusting |
| Lemon Juice 🍋 | 1 tbsp | Freshly squeezed |
The apples are non-negotiable here—Honeycrisp or Fuji are your best bets for that perfect balance of tender flesh and slight crunch. Costco or Trader Joe's always have them in season, and they hold up beautifully during pre-cooking. If you're using Granny Smiths for tartness, add an extra 1 tbsp of sugar to the apples. The cream cheese? Philadelphia brand is a must—it's the gold standard for smoothness. Grab the full-fat version (the good stuff, not the light kind), and let it sit out for 30 minutes before mixing. Trust me on this: room-temperature cream cheese blends like a dream.
No vanilla extract? Seeds from a vanilla bean steeped in warm water work beautifully—just steep 1 tsp of seeds in 1 tbsp water for 10 minutes. Short on sour cream? Greek yogurt at half the amount gets you close, though it'll be slightly tangier. The crust can be made ahead and chilled for up to 2 days—just let it sit at room temperature for 15 minutes before assembling. For the apples, if you're in a rush, microwave them for 5 minutes instead of simmering, but they won't be quite as tender. The cinnamon should be fresh—if it smells like dust, toss it and buy a new jar. Penzeys or Spicewalla carry the best quality if you're willing to splurge.
This dessert is a make-ahead dream. Assemble the entire cake (unbaked) up to 24 hours ahead—just cover it tightly and refrigerate. Bake straight from the fridge, adding 5-10 minutes to the baking time. Leftovers? Reheat individual slices in the microwave for 20-30 seconds—they're even better the next day when the flavors meld. For serving, dust with powdered sugar right before eating so it stays fresh. Store any uneaten portions in an airtight container in the fridge for up to 4 days. Freezing isn't recommended—this cake's magic is in its fresh-baked texture.
Why You'll Love This Recipe
- No Mixing Required: I swear, this is the kind of recipe where you can dump everything in one bowl and call it a day. No sifting, no folding, just toss the flour, butter, sugar, and eggs together—it’s like baking for people who actually have lives.
- Caramelized Edge Magic: That crispy, golden-brown crust? It’s all thanks to the brown sugar and butter baking until it’s just shy of burnt. Honestly, the first time I bit into it, I nearly dropped the fork—it’s the perfect balance of tender cake and buttery crunch.
- Weeknight Dinner Hero: Between us, this is my go-to when I need something impressive but zero-stress. Serve it warm with a scoop of vanilla ice cream, and suddenly you’ve got a dessert that feels like a restaurant treat—no one will guess it took less time than ordering takeout.
- Budget-Friendly Luxury: You’re using pantry staples here: flour, butter, sugar, eggs. No specialty ingredients, no fancy gadgets. I’ll be real, I’ve made this with store-brand applesauce and still had people begging for seconds—proof that good flavor doesn’t need a grocery haul.
Step-by-step instructions for apple cheesecake dump cake
This no-fuss method delivers a perfect balance of creamy cheesecake filling and spiced apple rivers in every slice.
Prepare the Crust Mixture
In a large bowl, combine the 2 cups all-purpose flour, 0.5 cup granulated sugar, 0.25 cup brown sugar, and 0.5 tsp salt. Cut in the 1 cup cold unsalted butter using a pastry cutter or your fingers until the mixture resembles coarse crumbs with pea-sized butter pieces. This texture is crucial for a flaky crust.
Add the 2 whole large eggs and 1 tsp vanilla extract, mixing just until the dough comes together. Press the dough evenly into the bottom of a 9-inch cast-iron skillet or pie dish, creating a thin, even layer. The dough should cover the bottom completely but not climb the sides. Chill in the refrigerator for 15 minutes while you prepare the filling.
Slice and Season the Apples
Peel, core, and slice the 4 medium red apples into ¼-inch thick slices. Toss them in a large bowl with 2 tsp cinnamon, 1 tsp ground ginger, and 1 tbsp freshly squeezed lemon juice. The lemon juice prevents browning while adding brightness to the apples. Let them sit for 5 minutes to absorb the spices.
Arrange the apple slices in a circular pattern over the chilled crust, slightly overlapping them. The apples should cover the entire surface but not pile up. This arrangement creates those beautiful apple rivers when baked. Press down gently to ensure good contact between the apples and crust.
Create the Cheesecake Filling
In the bowl of a stand mixer fitted with the paddle attachment, beat the 16 oz cream cheese and 0.5 cup sour cream on medium speed until completely smooth and creamy, about 2 minutes. Add the 0.5 cup granulated sugar and mix until fully combined. Scrape down the sides of the bowl as needed.
Pour the cheesecake mixture evenly over the apple slices, spreading it to the edges of the skillet. Use a spatula to create gentle swirls in the filling—this creates visual appeal and helps distribute the filling evenly. The mixture should cover the apples completely but not overflow the skillet.
Bake to Golden Perfection
Preheat your oven to 350°F. Bake the dump cake for 50-55 minutes until the edges are golden brown and the center is just set. You'll know it's done when a toothpick inserted near the center comes out with a few moist crumbs (not wet batter). The apples should be tender but still hold their shape slightly.
Remove from the oven and let cool in the skillet for 10 minutes. Then transfer to a wire rack and dust the top with 0.25 cup powdered sugar while still warm. Serve warm with a scoop of vanilla ice cream or whipped cream for the ultimate dessert experience.
Rest and Serve
Allow the cake to cool completely for at least 1 hour before slicing. This resting period lets the filling set properly and makes it easier to serve clean slices. The contrast between the warm, spiced apple rivers and creamy cheesecake filling is what makes this dessert truly special.
Slice into wedges and serve immediately. The crust should be buttery and slightly crisp, the apples tender with a perfect balance of sweet and spiced flavors, and the cheesecake filling rich and velvety. Each bite delivers that comforting combination of textures and flavors you'd expect from a classic cheesecake, but with the convenience of a dump cake.
Pro Tips For Making Apple Cheesecake Dump Cake
- Preheat Like a Pro: Crank that oven to 425°F (220°C) and let it scream for 15 minutes before baking. I learned this the hard way—skipping the preheat means your butter stays stubbornly soft, and the crust never gets that golden, crackly edge. Trust me, the extra wait makes all the difference for that dump-cake texture.
- Cut Butter Cold: Grab that unsalted butter straight from the fridge and cut it into ¼-inch cubes—no softening needed. Cold butter creates pockets of steam in the batter, which lifts the cake and keeps it tender. I used to melt it first, and the result? A dense, sad brick instead of a fluffy cloud.
- Don’t Overmix the Apples: Toss those sliced apples with sugar and cinnamon, but stop stirring once they’re just coated. Overmixing bruises the fruit, and you’ll end up with a watery mess in your cake. A quick toss is all it takes—your future self will thank you when the texture stays perfect.
- Tent with Foil Early: As soon as the edges look set (around 20 minutes), slap a loose tent of foil over the cake. This traps steam and keeps the top moist while the center finishes baking. I skipped this once and got a dry, cracked top—now I swear by it. Just poke a few holes so it doesn’t steam like a sauna.
Wine and beer pairings for this apple cheesecake dump cake
Warm Apple Cider
There’s nothing quite like a mug of spiced apple cider to complement this dessert’s cozy flavors. Heat 2 cups apple cider with 1 cinnamon stick, 2 star anise pods, and 1 strip orange peel in a saucepan until steaming (don’t boil).
Strain and serve warm—its aromatic sweetness mirrors the cake’s spiced apples. 🍎
Dessert Wine Pairings
A dry Riesling from Germany or Austria cuts through the richness of the cheesecake while enhancing the apple’s natural acidity. Look for a Kabinett or Spätlese—these wines have enough sweetness to match the dessert but bright acidity to cleanse your palate.
My go-to is Dr. Loosen Blue Slate Riesling. 🍷
Creamy Vanilla Port
For a boozy twist, serve with a tawny Port—its caramel and vanilla notes harmonize beautifully with the cheesecake’s creaminess. A 10-year Tawny like Graham’s Six Grapes adds depth without overpowering the dessert’s delicate spices. Keep the pour small (1 oz per serving) to let the cake shine. 🥂
Beer Pairings
A Belgian witbier like Hoegaarden or Stella Artois works surprisingly well—their citrusy, spiced notes complement the apple’s warmth. For a bolder option, try a honey-brown ale such as New Belgium Fat Tire, which balances the dessert’s sweetness with malty richness. 🍺
Coffee Contrast
If you prefer coffee, a lightly sweetened espresso or cappuccino with a sprinkle of cinnamon adds a surprising contrast. The bitterness of the coffee highlights the dessert’s creamy texture, while the cinnamon ties back to the apple’s spice profile. Skip the sugar—let the cake’s sweetness shine. ☕
Nutrition facts
Frequently asked questions
Can I use frozen apples instead of fresh?
Thaw frozen apples completely first, then slice them as directed. For best results, pat them dry with a paper towel before arranging on the crust—this prevents excess moisture that could make your crust soggy. Frozen apples work especially well when you're short on time.
How do I know when the cheesecake filling is done?
The center should be just set when a toothpick inserted comes out with moist crumbs (not wet batter). The edges should be golden brown, and the apples should look tender but not mushy. If you're unsure, bake for 5 minutes longer—the filling will continue cooking after removal.
Can I make this in a different pan?
Yes, but adjust the baking time. A 9-inch pie dish requires 50-55 minutes, while an 8-inch skillet may need 40-45 minutes. The key is to use a pan with 2-inch high sides—this prevents overflow when the filling rises. Glass pans may need 5-10 extra minutes since they conduct heat differently.
Why did my crust get greasy?
Greasy crusts usually happen when butter melts too quickly. Chill the crust for 15 minutes before baking, and place a baking sheet under your pan to catch drips. Use cold butter (not softened) and avoid overmixing the dough—this prevents excess fat from releasing during baking.
Can I make this ahead of time?
Yes! Assemble the unbaked cake (crust + apples + filling) up to 24 hours ahead and refrigerate. Bake straight from the fridge, adding 5-10 minutes to the time. Leftovers keep well in an airtight container for 4 days—reheat individual slices for 20-30 seconds in the microwave for best texture.