
Desserts
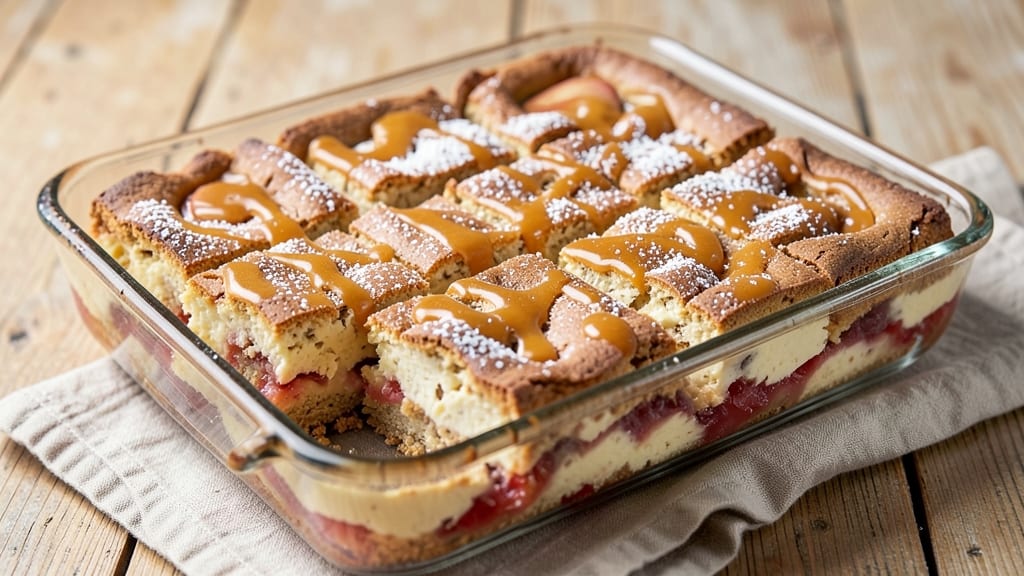
This apple blondie cheesecake bars recipe delivers the perfect balance of chewy blondie layers, creamy cheesecake filling, and caramelized apple swirls in every bite. 🌟 The secret lies in baking the blondie base first, then spreading the tangy cheesecake mixture and swirling in spiced apple compote for a dessert that's both elegant and foolproof.
What makes these bars special is their versatile texture—the crisp edges of the blondie crust contrast beautifully with the velvety cheesecake layer, while the apple swirl adds a touch of autumnal warmth.
No fancy equipment is needed beyond a 9x13-inch pan and a spatula, making this recipe perfect for both beginners and seasoned bakers.
The result is a rich, layered dessert that's perfect for holidays, potlucks, or satisfying a sweet craving. The caramelized apple swirl ties everything together with its natural sweetness and subtle spice, while the buttery crust ensures every bite is satisfying.
Serve warm with a scoop of vanilla ice cream for the ultimate indulgence.
These bars stay fresh for up to 5 days in the fridge, making them ideal for meal prep or gifting. The combination of textures and flavors makes them impossible to resist—once you try them, you'll want to make them again and again.
Ingredients for apple blondie cheesecake bars
Buttery blondie base, creamy cheesecake filling, and caramelized apple swirl—just 16 ingredients for showstopping bars!
| Ingredient | Amount | Notes |
|---|---|---|
| All-Purpose Flour 🌾 | 2 cups | Sifted for light texture |
| Granulated Sugar 🍚 | 1 ½ cups | White or light brown |
| Packed Brown Sugar 🍚 | ½ cup | Light or dark variety |
| Unsalted Butter 🧈 | 1 cup | Cold, cubed for best texture |
| Large Eggs 🥚 | 2 whole | Room temperature |
| Vanilla Extract 🍯 | 1 tbsp | Pure extract preferred |
| Baking Powder 🧂 | 1 tsp | Aluminum-free preferred |
| Salt 🧂 | ½ tsp | Fine sea salt |
| Cream Cheese 🧀 | 8 oz | Room temperature, full-fat |
| Sour Cream 🥛 | ½ cup | Full-fat for richness |
| Granulated Sugar 🍚 | ½ cup | For cheesecake layer |
| Apples 🍎 | 2 medium | Peeled, cored, diced small |
| Lemon Juice 🍋 | 1 tbsp | Freshly squeezed |
| Cinnamon 🌿 | 1 tsp | Ground, for apple spice |
| Vanilla Extract 🍯 | ½ tsp | For apple compote |
| Powdered Sugar 🍚 | ¼ cup | For dusting top |
The cream cheese and butter are non-negotiable here—full-fat versions make all the difference. Grab Philadelphia brand if you can, but any good-quality block works. For the apples, Honeycrisp or Fuji stay firm when baked, but Granny Smith adds extra tang. Walmart or Trader Joe's usually have prepped apples in the produce section—saves time. The flour should be King Arthur or Bob's Red Mill for that perfect crumb. Pro tip: Toast your brown sugar in a dry pan for 2 minutes before mixing—deepens the caramel notes.
No cream cheese? Substitute with 4 oz mascarpone mixed with 4 oz Greek yogurt—still tangy, just lighter. Running low on vanilla? Almond extract at half the amount works in a pinch. The apple compote can be made ahead and stored in the fridge for up to 3 days—just reheat gently before swirling. For extra spice, add a pinch of nutmeg to the apple mixture. And if you're feeling fancy, top with candied pecans—they toast beautifully while baking.
These bars keep 5 days in the fridge, covered tightly, but honestly? They disappear faster. For gifting, wrap individual bars in parchment and tie with twine—looks gorgeous. Freeze for up to 3 months by wrapping tightly in plastic. The blondie layer stays crisp best when stored at room temperature for 1-2 hours before serving. And trust me, warm bars with vanilla ice cream are next-level indulgence.
Why You'll Love This Recipe
- One-Bowl Wonder: I swear by this recipe when I’m too tired to measure three separate bowls—just cream butter and sugars, toss in dry ingredients, fold in apples, and bake. The eggs and brown sugar do all the heavy lifting while I’m stirring.
- Caramel-Apple Magic: That combo of warm cinnamon, tender apples, and creamy cheesecake filling? It’s like biting into autumn in bar form. Honestly, the brown sugar crust alone makes me want to skip dessert and just eat the edges first.
- Weeknight Workhorse: I keep these in the freezer for lazy mornings or after-school snacks—just slice and go. They’re just as good cold as they are warm, and the kids (yes, even the picky ones) actually finish their portions.
- Budget Baking Gold: Flour, sugar, butter, eggs—these are staples I already have. No fancy cheeses or specialty flours here, just a foolproof way to turn simple ingredients into something that tastes like a bakery treat. My wallet and I both approve.
Step-by-step instructions for apple blondie cheesecake bars
Here's how to create the perfect blend of blondie and cheesecake with that irresistible caramelized apple swirl!
🍳 Step 1: Make the Buttery Crust
Preheat your oven to 350°F and line a 9x13-inch baking pan with parchment paper. In a food processor, combine the 1 cup unsalted butter and 0.5 cup packed brown sugar until light and fluffy. Add 2 cups all-purpose flour, 0.5 tsp salt, and pulse until the mixture resembles coarse crumbs.
Press this mixture evenly into the bottom of your prepared pan, using the back of a spoon to create an even layer. Bake for 12-15 minutes until the edges are just starting to turn golden. This crust is the foundation—don't skip this step!
🥘 Step 2: Prepare the Cheesecake Layer
While the crust bakes, beat the 8 oz cream cheese and 0.5 cup granulated sugar together in a large mixing bowl until smooth and creamy. Add the 2 whole large eggs one at a time, mixing well after each addition. Stir in the 0.5 cup sour cream, 1 tbsp vanilla extract, and 1 tsp baking powder until just combined.
Pour this mixture over the partially baked crust. Return to the oven and bake for 20-25 minutes until the edges are set but the center still jiggles slightly. The cheesecake layer should be just about done—it'll finish cooking with the blondie layer.
🍳 Step 3: Create the Caramelized Apple Swirl
In a medium saucepan, combine the 2 medium apples (diced small), 1 tbsp lemon juice, 1 tsp cinnamon, and 0.5 tsp vanilla extract. Cook over medium heat for 8-10 minutes, stirring occasionally, until the apples are tender and the mixture has thickened slightly. Let this cool completely.
Once cooled, spread the apple mixture evenly over the partially baked cheesecake layer. You'll want to create a smooth, even layer—this is where the magic happens!
🍳 Step 4: Make the Blondie Topping
In a separate bowl, mix together the remaining 1 cup unsalted butter, 1.5 cups granulated sugar, and 1 tbsp vanilla extract until well combined. Gradually add the 2 whole large eggs one at a time, mixing well after each addition. Stir in the 2 cups all-purpose flour, 1 tsp baking powder, and 0.5 tsp salt until just combined.
Spread this blondie mixture evenly over the apple layer. You'll want it to cover the entire surface completely. Here's the thing—don't worry if it looks like too much. The blondie layer will spread slightly as it bakes.
🔥 Step 5: Bake to Golden Perfection
Return the pan to the oven and bake for an additional 25-30 minutes until the blondie layer is golden brown and a toothpick inserted into the center comes out clean. The bars should look beautifully golden with a slightly crackled top.
Let the bars cool completely in the pan for at least 2 hours before cutting. This resting time is crucial—it allows the layers to set properly and makes for cleaner slices. Once cooled, dust the top with 0.25 cup powdered sugar for that final touch of sweetness.
🍽️ Step 6: Cut and Serve
Using a sharp knife, cut the bars into 16 equal squares. For the cleanest cuts, dip the knife in hot water and wipe it dry between cuts. Serve at room temperature for the best texture and flavor combination.
Each bite delivers a perfect blend of creamy cheesecake, spiced apple, and buttery blondie. The contrast of textures and flavors makes these bars truly special—crispy crust, silky cheesecake, tender apples, and that perfect blondie top!
Pro Tips For Making Apple Blondie Cheesecake Bars
- Melt Butter Slowly: I learned this the hard way—dumping cold butter into the dry ingredients makes for a lumpy mess. Instead, cut the butter into small cubes and melt it just until it’s liquid but not browned (about 5 minutes on low heat). Pour it into the flour mixture while it’s still warm, then stir like you’re folding in buttercream. The texture stays smooth, and the blondie layer won’t turn out greasy.
- Use Room-Temp Eggs: Cold eggs sink to the bottom and create dense pockets in the cheesecake layer. Take your eggs out of the fridge 30 minutes before mixing—just enough time to warm them to room temperature. If you’re in a rush, place them in a bowl of warm water for 10 minutes. The bars will bake evenly, and the filling won’t curdle.
- Skip Overmixing the Batter: Once you add the eggs to the dry ingredients, mix just until combined—no more. Overworking the batter develops gluten, and those blondie bars turn out tough instead of tender. Use a spatula to gently fold everything together, and stop when there are no more flour streaks. Trust me, the recipe works.
- Bake in Two Stages: Start the blondie layer at 350°F (175°C) for 15 minutes to set the base, then reduce the heat to 325°F (165°C) and bake the rest of the time. This prevents the bottom from burning while the top finishes baking. If your oven runs hot, use an oven thermometer—mine did, and I nearly ruined a batch before I caught it.
Essential equipment for this dish
Must-Have Mixing Tools
Start with a stand mixer or hand mixer for creaming butter and sugar—this ensures light, fluffy layers. I swear by my KitchenAid Artisan Series (about $200) for its powerful performance, but a Cuisinart SM-50 ($120) works just as well.
For smaller batches, a hand mixer like the Black+Decker BM4500 ($30) gets the job done without breaking the bank. 🔥
Baking Pan Essentials
Your 9x13-inch baking pan is the star here—opt for a heavy-gauge aluminum pan (like Wilton Premium) for even heat distribution. Avoid nonstick pans; they can cause uneven baking.
Line it with parchment paper (I use Starfrit) to prevent sticking and make cleanup effortless. Pro tip: Grease the edges lightly with butter to ensure clean cuts later.
Precision Measuring Gear
Baking is a science, so accurate measurements matter. Invest in a stainless steel measuring cup set (like OXO Good Grips) for dry ingredients and a liquid measuring pitcher with a spout.
For the cream cheese and butter, use a digital kitchen scale (I love the Escali Primo)—it’s more precise than volume measurements, especially for delicate layers like cheesecake.
Apple Prep Tools
A mandoline slicer ($20-30) speeds up apple dicing for the compote, but a sharp chef’s knife works too. For even slices, use a peeler to remove the skin first. A fine-mesh strainer (like OXO Good Grips) helps thicken the apple mixture if it’s too watery after cooking.
Don’t skip the lemon juicer—freshly squeezed lemon juice brightens the apples instantly.
Spreading and Swirling
An offset spatula ($10-15) is your best friend for spreading the cheesecake and blondie layers evenly. I use a 6-inch rubber spatula from Amazon Basics—it’s flexible enough to reach corners without tearing layers.
For the apple swirl, a small rubber scraper helps create clean, even lines. A pastry brush (like West Bend) comes in handy for dusting powdered sugar on top.
Cooling and Cutting
Let the bars cool on a wire cooling rack (I prefer OXO’s collapsible rack) to prevent sogginess. For cutting, a sharp chef’s knife is non-negotiable—dip it in hot water between cuts to prevent crumbling.
A pizza cutter ($15) works too if you’re in a hurry, but it won’t give you those clean, professional-looking edges. Store leftovers in an airtight container (like Rubbermaid Brilliance) to keep them fresh for days. 💫
Nutrition facts
Frequently asked questions
Can I make these bars without a food processor for the crust?
For the crust, cut the 1 cup cold butter into small cubes and use a fork to mix it with the 0.5 cup brown sugar and 2 cups flour until it resembles coarse crumbs. Press it into the pan by hand—just work it in with your fingers or the back of a spoon. The texture will be slightly less refined, but still delicious!
How do I prevent the blondie layer from cracking?
Cracking usually happens when the blondie layer bakes too quickly or the oven temperature fluctuates. First, make sure your oven is fully preheated to 350°F before baking. Place the pan on the middle rack for even heat distribution. Also, avoid opening the oven door during the 25-30 minute baking time—this disrupts the heat and can cause uneven cooking.
Can I substitute the apples with another fruit?
Yes, but the texture and flavor will change. For a similar sweet-tart balance, try peaches or plums (use 1.5 cups diced). For a richer flavor, berries (like raspberries or blueberries) work well—just reduce the lemon juice to 0.5 tbsp and add 0.25 tsp extra cinnamon. Avoid overly watery fruits like strawberries, as they can make the bars soggy.
Why did my cheesecake layer not set properly? Undercooked cheesecake is usually caused by overmixing or opening the oven too early.
Can I make these bars ahead of time?
Yes! These bars actually taste even better the next day. Once fully cooled, wrap them tightly in plastic wrap or store in an airtight container in the fridge for up to 5 days. For longer storage, freeze individual portions for up to 3 months. Let them thaw at room temperature for 1-2 hours before serving to restore the perfect texture.