
Desserts
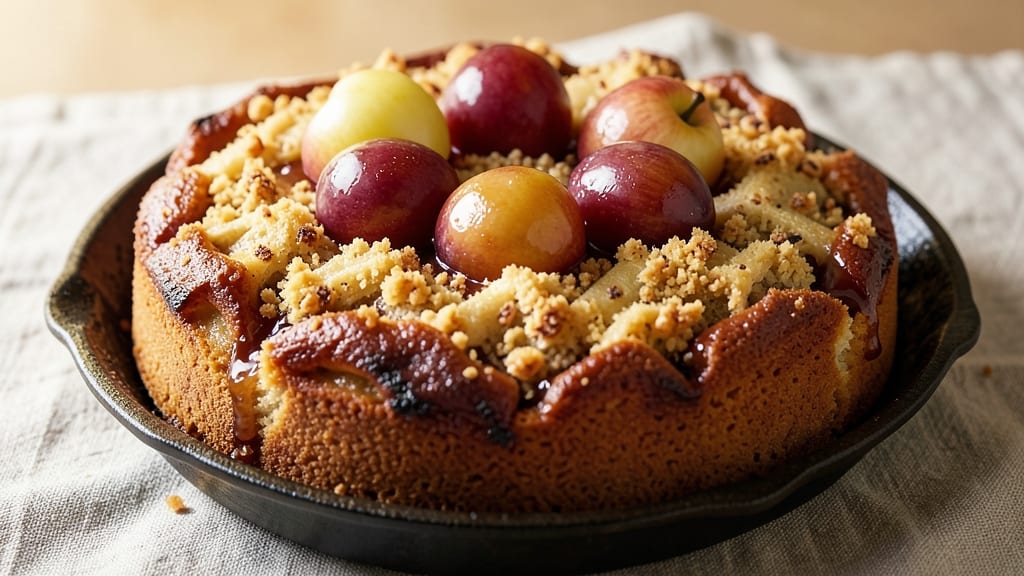
This apple and plum upside-down cake delivers a perfect balance of caramelized fruit and tender vanilla layers—every bite is a harmony of sweet, spiced flavors. The secret lies in layering plums and apples directly on the pan, letting them caramelize into a golden crown while the cake bakes underneath.
I’ve perfected this technique to ensure a moist crumb and even browning, so even beginners can achieve restaurant-quality results.
The magic happens in the oven, where the fruit’s natural juices release and mingle with a touch of sugar, creating a glossy, sticky top that’s irresistible. A simple spiced vanilla cake batter—infused with cinnamon and nutmeg—complements the fruit’s tartness beautifully.
The cake’s layers stay tender thanks to a few key tricks, like not overmixing the batter and using the right oven temperature for even cooking.
Once inverted, you’ll have a stunning dessert with a caramelized fruit crown that looks as good as it tastes. Serve it warm with a scoop of vanilla ice cream or a dollop of whipped cream to enhance the flavors.
The contrast of warm cake, cool topping, and the sweet-tart fruit creates a texture and taste experience that’s hard to resist.
This recipe is beginner-friendly but feels special enough for gatherings—whether it’s a cozy family dinner or a holiday dessert spread. The steps are straightforward, and the result is always impressive. Let’s get baking!
Ingredients for apple and plum upside down cake
Pantry staples plus seasonal fruit create this stunning dessert with caramelized fruit crown.
| Ingredient | Amount | Notes |
|---|---|---|
| Apples 🍎 | 2 medium | Peeled, cored, sliced into wedges |
| Plums 🍑 | 4 medium | Pitted, halved, sliced into wedges |
| Granulated Sugar 🍚 | 1 ½ cups | For caramelizing fruit |
| All-Purpose Flour 🌾 | 2 cups | Sifted for light texture |
| Granulated Sugar (for batter) 🍚 | ¾ cup | Plus 2 tbsp for cake batter |
| Brown Sugar 🍚 | ½ cup | Packed, for moisture |
| Unsalted Butter 🧈 | ¾ cup | Softened for creaming |
| Large Eggs 🥚 | 2 whole | Room temperature |
| Vanilla Extract 🍯 | 1 tbsp | Pure extract preferred |
| Ground Cinnamon 🌿 | 1 tsp | Freshly ground preferred |
| Ground Nutmeg 🌿 | ½ tsp | Freshly grated nutmeg |
| Salt 🧂 | ½ tsp | Fine sea salt |
| Milk 🥛 | ½ cup | Whole milk for richness |
| Baking Powder 🍞 | 1 ½ tsp | Freshly measured |
The fruit selection is key here—firm but ripe apples (like Honeycrisp or Granny Smith) and plums (like Santa Rosa or Italian prunes) work best. Local farmers markets often have the freshest varieties, but any grocery store produce section should have suitable options. Look for plums that yield slightly to gentle pressure and apples that aren't too soft. The sugar amount can be adjusted based on fruit sweetness—reduce by 2 tbsp if your fruit is very sweet. For best results, prep the fruit while the oven is preheating so it has time to release juices before baking.
No plums? Substitute with additional apples or peaches—just reduce the sugar by 1 tbsp. Running low on brown sugar? White sugar works at the same amount, though the cake will be slightly less moist. The baking powder is non-negotiable here—old baking powder loses potency, so check the expiration date. For extra flavor, add a pinch of cardamom to the batter (it pairs beautifully with the fruit). The milk can be any kind, but whole milk gives the richest texture. If you're dairy-free, use a full-fat coconut milk instead.
Prep the fruit and pan first—caramelizing takes 20 minutes before adding batter. Store any leftover fruit in an airtight container in the fridge for 3 days or freeze for 3 months. The cake itself keeps well wrapped at room temperature for 2 days or in the fridge for 5 days. For best texture, serve at room temperature. The caramelized fruit crown reheats beautifully—just cover with foil and warm in the oven for 5 minutes before serving.
Why You'll Love This Recipe
- No Fuss Setup: I swear by this—just slice the fruit, sprinkle sugar, and bake. The apples and plums caramelize right in the pan, so no fancy layering or piping. Honestly, my 10-year-old "helps" by pressing the fruit into the sugar, and it still turns out perfect.
- Sweet-Tart Magic: That balance? Chef’s kiss. The plums bring juicy depth while the apples add a gentle crunch, all wrapped in a buttery crumb that’s dangerously easy to over-slice. I’ll be real: I’ve caught myself eating it straight from the pan before it even cools.
- Weeknight Crowd-Pleaser: This feeds six but costs less than takeout—plus, it’s the one dessert that even my picky uncle requests. Serve it warm with vanilla ice cream for dinner guests, or pack slices for school lunches. (Yes, even on a Tuesday night.)
- Leftovers? More Like Second Helpings: The cake keeps beautifully for days, and the flavors actually improve overnight. I freeze slices for quick breakfasts or after-school snacks—no one ever complains when it’s reheated with a drizzle of honey. My secret weapon for lazy mornings.
Step-by-step instructions for apple and plum upside down cake
This method delivers a perfectly caramelized fruit crown and moist spiced layers every time.
Caramelize the Fruit
Preheat your oven to 350°F. Arrange the 2 medium Apples and 4 medium Plums in a circular pattern on the bottom of a 9-inch cast iron skillet or oven-safe pan. The fruit should fit snugly in a single layer, touching each other. This arrangement creates that iconic upside-down cake crown.
In a small saucepan, combine 1.5 cups Granulated Sugar and ¼ cup water. Bring to a boil over medium-high heat without stirring until it turns a deep amber color—this should take about 8-10 minutes. Immediately pour the hot sugar syrup evenly over the fruit. You'll see it bubble and sizzle—this is what creates that beautiful caramelized crust.
Bake for 20 minutes until the fruit is tender and the caramel has thickened slightly. The fruit should be fork-tender but not mushy. Remove from the oven and let cool for 5 minutes while you prepare the batter. This brief rest prevents the fruit from shifting when you add the cake layer.
Prepare the Cake Batter
In a large mixing bowl, cream together the 0.75 cup Unsalted Butter and 0.5 cup Brown Sugar using an electric mixer on medium speed for 3-4 minutes until light and fluffy. This step incorporates air, which creates a tender cake texture. Scrape down the sides of the bowl occasionally to ensure even mixing.
Add the 2 whole Large Eggs, one at a time, mixing well after each addition. Then stir in the 1 tbsp Vanilla Extract. In a separate bowl, whisk together the 2 cups All-Purpose Flour, 1.5 tsp Baking Powder, 1 tsp Ground Cinnamon, 0.5 tsp Ground Nutmeg, and 0.5 tsp Salt. Gradually add the dry ingredients to the butter mixture, alternating with the 0.5 cup Milk, beginning and ending with the flour.
Finally, add the remaining 0.75 cup Granulated Sugar (for batter) plus 2 tbsp additional Granulated Sugar and mix until just combined. The batter should be smooth but slightly thick. Overmixing develops gluten, which can make the cake dense. Stop mixing as soon as all ingredients are incorporated.
Assemble and Bake
Pour the cake batter evenly over the caramelized fruit in the skillet. Use a spatula to spread it gently, ensuring the batter covers all the fruit. The batter should come about halfway up the sides of the fruit. Return to the preheated oven and bake for 30-35 minutes or until a toothpick inserted into the center comes out clean.
Watch for the edges to turn golden brown while the center remains slightly springy. The cake is done when it pulls away from the sides of the pan with a gentle tap. Remove from the oven and let cool in the pan for 10 minutes. This resting period helps the cake set before you flip it.
Flip and Serve
Run a thin knife around the edge of the cake to loosen it from the pan. Place a large plate upside down over the skillet and carefully flip both the plate and skillet together. Lift the skillet away to reveal your upside-down cake with the fruit crown on top. Let the cake cool completely on the plate before serving.
Slice with a sharp knife and serve warm or at room temperature. The caramelized fruit should be tender with a glossy glaze, and each bite should deliver a perfect balance of sweet, spiced cake and fruity caramelized goodness. The cake's texture should be moist with a tender crumb—never dry or crumbly.
Pro Tips For Making Apple And Plum Upside Down Cake
- Halve the Fruit First: Slice apples and plums into ¼-inch thick rounds—thicker pieces stay undercooked, while thinner ones caramelize perfectly. I learned this the hard way after pulling out a cake with chewy fruit centers.
- Butter the Pan: Coat the springform pan with softened butter and a light dusting of flour before arranging fruit—this prevents sticking and makes flipping easier. (Yes, even if you’re impatient like me.)
- Skip the Overcrowding: Leave gaps between fruit slices—packing them too tightly traps steam and turns the bottom crust soggy. Think of it like a fruit mosaic, not a puzzle.
- Test for Doneness Early: Check the cake at 40 minutes—if the edges pull away cleanly, it’s done. Overbaking dries out the fruit and makes the cake dense. (Your future self will thank you.)
Common mistakes when making great apple and plum upside down cake
Overmixing the Batter
The most common mistake is overmixing the cake batter after adding the flour. Once you incorporate the dry ingredients, mix just until combined—about 10-15 strokes with a spatula. Overmixing develops gluten, which creates a tough, dense cake instead of the tender crumb you want.
I’ve seen beginners mix for full minutes after the flour disappears, and the result is always disappointing. 💫
Uneven Fruit Caramelization
Skipping the 5-minute rest after caramelizing the fruit can cause it to shift when you add the batter. This leads to uneven coverage and some fruit pieces staying raw. Always let the caramel set slightly before pouring the batter.
Another mistake is using fruit that’s too soft—overripe apples or plums will turn mushy during baking. Stick to firm but ripe fruit for that perfect balance of tenderness and structure.
Incorrect Sugar Syrup Color
Many home bakers stop the sugar syrup too soon, resulting in a pale, almost transparent caramel. For that deep amber color, let it boil until it reaches a rich, deep brown—about 8-10 minutes.
Stirring the syrup even once can cause crystallization, ruining the caramel. I recommend using a candy thermometer to hit 320°F for perfect caramelization every time.
Skipping the Flip Prep
Attempting to flip the cake without first running a knife around the edges or letting it cool for 10 minutes in the pan is a recipe for disaster. The cake will crack or collapse, and the fruit crown might slide off.
Always let the cake set slightly before flipping, and use a sharp, thin knife to loosen the edges. A 9-inch cast iron skillet makes this step much easier than glass pans.
Overbaking the Cake
Leaving the cake in the oven until it’s completely dry is a common mistake. The cake should pull away from the sides of the pan with a gentle tap and have a slight bounce when pressed in the center.
Overbaking dries out the cake and makes it crumbly. I recommend checking for doneness at 30 minutes and letting it finish baking while you prepare the serving plate.
Using the Wrong Pan
Not all pans are created equal for upside-down cakes. Glass pans conduct heat differently and can cause uneven baking, while nonstick pans may not get hot enough for proper caramelization. A 9-inch cast iron skillet** is my top recommendation because it distributes heat evenly and creates that perfect caramelized crust.
If you don’t have cast iron, a heavy stainless steel pan works well too.
Nutrition facts
Frequently asked questions
Can I use canned fruit instead of fresh for this upside-down cake?
Fresh fruit is ideal for the best texture and flavor, but you can use canned fruit in a pinch! Drain and rinse the fruit well to remove excess syrup, then pat dry completely. For plums, use plums packed in light syrup or water. Reduce the sugar in the caramelization by 2 tablespoons since canned fruit is often pre-sweetened. The texture will be slightly softer but still delicious.
Why did my fruit crown stick to the pan instead of the cake?
This usually happens when the cake doesn't set enough before flipping or if the pan wasn't properly greased. Always let the cake cool in the pan for 10 minutes after baking, then run a thin knife around the edges to loosen it. A 9-inch cast iron skillet works best—it creates a natural nonstick surface when hot. If your pan is sticky, try using a little butter or oil to grease it before starting.
How do I store leftovers to keep them fresh?
Store the cake in an airtight container at room temperature for up to 2 days, or refrigerate for 4-5 days. The fruit crown reheats beautifully—cover with foil and warm in the oven at 300°F for 5 minutes before serving. For longer storage, wrap individual slices in plastic wrap and freeze for up to 3 months. Thaw overnight in the fridge before reheating.
Can I make this cake without a cast iron skillet?
Yes! While cast iron is ideal, a heavy oven-safe pan like stainless steel or ceramic will work. Avoid glass or nonstick pans—they don't conduct heat as well. For best results, preheat your pan in the oven for 5 minutes before adding the fruit. If using a lighter pan, reduce the oven temperature by 25°F and check for doneness 5 minutes earlier to prevent overbaking.
What's the best way to serve this cake?
Serve warm with a scoop of vanilla ice cream or a dollop of whipped cream to contrast the warm cake and caramelized fruit. For an elegant touch, dust with powdered sugar or garnish with fresh mint leaves. The cake's spiced flavor pairs beautifully with coffee or chai tea. For a make-ahead option, assemble the cake the night before and bake it in the morning—it reheats perfectly!